夏のワンピース用に、幡垂飾のベルトが欲しいとずっと思っていましたが、夏も間近に迫り、取り掛かることにしました。ベルト部分は70cm、両端の結ぶ部分は25cmずつで、計120cmが必要です。糸を組むとその長さは約70%になるので、必要な糸の長さは170cmです。今回は、Ingrid Crickmore のブログの長いブレイドのまねをしてみることにしました。
約3分の1のところから組み初め、あとで長さを調整するために、結ぶ部分は組まずにクテを付けたままにしておきました。次に紐をひっくり返して、3分の1の長さでクテを付け、イングリッドがキャタピラと呼ぶ鎖編みを作りました。この部分が組む時に邪魔になるのではと心配したのですが、意外と問題なく進めました。ただし、糸が短くなってくるとやはり手元が混乱したので、予定の3分の2より10cm短い時点でキャタピラをほどきました。その結果、最後の3分の1はクテを含めて80cmになってしまいましたが、何とか組めました。
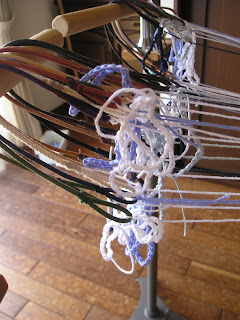
いつもはクテを糸の端に取り付けるので、今回のように糸の途中で同じ長さの位置に取り付けるのは大変でした。でも、ここですべての糸の長さを揃えておかないと、仕上がりに影響しますから、何回か付け替えて、長さを揃えました。これにかなりの時間がかかり、糸がもつれたりしました。この時に思い出したのが、一昨年のシアトルでのワークショップでイングリッドにもらった櫛とゴムバンドでした。この櫛とゴムバンドを織機の筬のように使って、糸が絡まないようにしました。写真左で櫛が立つように支えているのは、マレーシアでお土産にもらったポストカードスタンドです。
両端の結ぶ部分は、2本の角組にして、ビーズを付けました。ビーズの重みで、結んだ組紐がすとんと落ちてくれます。
今回は長さの記録を更新して120cmを達成しましたが、糸の扱いにかなり苦労しました。
初期配色:
〇〇◍◍〇〇◎◎● ●◎◎〇〇◍◍〇〇
I have been wanting a Bansuishoku belt for a summer dress. With the summer just around the corner, I set about to work. I need 70cm for a belt and 25cm each for the ends to be tied, in total 120cm. Since threads become 70% long when braided, I need 170cm long threads. I watched the latest blog of Ingrid Crickmore where she explains how to make longer braids and decided to follow her instructions.
I started at one third of the length and kept Kute at the end so that I can adjust the length later. Then I turned around the braid and attached kute at the point of one third of the length, and made what Ingrid calls Catapilar. I was afraid that these catapilars might disturb braiding, but I had no problem! However, near the end, when the threads became shorter, catapilars started bite each other and I had to undo the catapilars 10 shorter than I had planned. As a result, the last one third was 80cm including kute, which I somehow managed to braid.
Usually, I attach kute at the end of a thread. It was not easy to attach kute in the middle of a thread at the same length. It is very important to make all the threads the same length in order to have a good finish. Therefore, I had to redo attaching several times, which took me a lot of time. To avoid threads to be entangled, I used the comb and the rubber band which Ingrid gave us at the workshop in Seattle two years ago. Using them as a reed of a loom, I managed to arrange threads. The grey thing at the left of the photo supporting the comb is a postcard stand I got in Malaysia.
I used beads for the both ends of the belt so that their weight makes the tied ends straight down.
I have renewed my record of braid length 120cm, but I had a hard time dealing with the threads.
Initial color arrangement:
〇〇◍◍〇〇◎◎● ●◎◎〇〇◍◍〇〇


