2017年10月24日火曜日

源氏打ち Genjiuchi BBCC

「クテ打組紐技法入門」シリーズから源氏打ちBBCCを取り上げます。初期の配色設定は以下の通りです。
(ア)  ①②①②①② ②①②①②①
             左手       右手

左右対称です。これを非対称にすると、

(イ)   ①②①②①② ①②①②①②

がらりと変わります。紐は丸みを帯びていますが、ループ数が偶数なので、右手側面がやや広く、左手側面はそれよりは狭くなっています。巾着の紐などにちょうどいいですね。

真の一番上の茶と黄色の紐は、途中で(ア)から(イ)に変え、また(ア)に戻りました。ループの配置を変える時は、1度に変えるのではなく、組みながら順に変えていった方が、仕上がりに無理がなく滑らかになります。


3色でやってみました。
(ウ)   ①①①①①① ②③②③②③  

 
(エ)   ①①①①①① ③②③②③②


写真2番目の緑、ピンク、グレーの紐は、最初は(ウ)で②のグレーが右側面に来ました。(エ)にすると、③のピンクが右側面に来ました。


次は4色です。
(オ) ①②①②①② ③④③④③④


(カ) ①②①②①② ④③④③④③


左右の側面には左右同じ色(単色)の矢羽根ができ、上下の面には左右異なる色の矢羽根ができます。これを全て単色の矢羽根にできないかと考えたのが一番下です。

(キ) ①②①②①② ③①③①③①
    ④②④②④② ③④③④③④


① と④の2色ループを6本、単色ループ②と③をそれぞれ3本ずつ使っています。


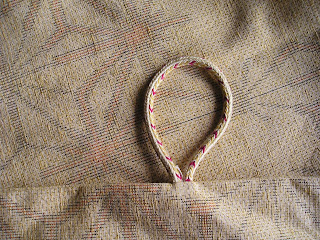
応用作品です。紬の着物地でスカーフを作りました。スカーフが滑ってこないように、源氏打ちの紐を肩の辺りに縫い付けました。
 (ク) ①①①②①①  ②①①①③①

いつもはコットンキングを使っていますが、この時は幡垂飾を組んだ残りのハマナカのアプリコを使いました。ベージュは金ラメ入りです。

We try Genjiuchi BBCC from the book “Introduction to Kute-uchi Kumihimo Technique”.  The initial color arrangements are as follows.

A)  ①②①②①② ②①②①②①
    Left       Right

Bilaterally symmetric.  We can change it slightly like this.
   
B)   ①②①②①② ①②①②①②

The pattern changes dramatically.  The braid is round, but since the number of the loops is even, right hand side is a little wider than the left hand side.  The braid is ideal for drawstring purses.

To make the top brown and yellow braid, first I did A) then B) and back to A) again.  When you change loop positions, I recommend that you change loop positions one by one as you braid, rather than you change all the loops at once.  That way, the finished braid looks better.


The second one in green, pink and grey started like this.
C)      ①①①①①① ②③②③②③   
D)      ①①①①①① ③②③②③②

The grey② came to the right hand side when I started C), and the pink③ came to the right hand side when I changed to D).

Then four colors.
E)    ①②①②①② ③④③④③④
F) ①②①②①② ④③④③④③

On both sides we have two single-color chevrons alternately, and on top and bottom we have chevrons with different colors on right and left.  I wanted to have 4 single-color chevrons and came up with the following:

G) ①②①②①② ③①③①③①
  ④②④②④② ③④③④③④

I used 6 bi-color (① and ④) loops, and 3 single-color loops in ② and ③ each.


Here is a scarf I made with kimono material.  I attached a BBCC braid at around the shoulder so that the scarf does not slip down.

H) ①①①②①①  ②①①①③①

Though I usually use Cotton King, this time I used Aprico from Hamanaka that I bought to make Bansuishoku in April.

2017年10月13日金曜日

正倉院の大幡  Ritual Banner in Shosoin


秋は展覧会の季節です。奈良では毎年、正倉院展が開かれます。昨年は組紐で飾られた大幡が出品されたので、勇んで出かけました。全長458cm幅90の大幡がガラスケースの中に横たわっていました。まさしく威風堂々でした。ケースの上からじっくり見せて頂きました。本当は、幡をひっくり返して、裏側も見たかったです。かなり痛んだ部分もあって、白糸で抑えてありました。本体の幡身が青や赤のアップリケで目を引くものですから、組紐の部分もきっと鮮やかな色だったに違いありません。撚りの強い糸を使った一間組でした。奈良国立博物館の清水健氏の「正倉院の荘厳具-大幡に寄せて-」という講演も拝聴しました。その時のお話が大変興味深かったので、紹介します。

幡とは、古代インドが起源で、中国、朝鮮半島を経て日本に伝来した、仏教荘厳に欠かせない仏具でした。日本への仏教の公式な伝来は552年とされていますが、この時百済の聖明王が日本に贈ったのは、日本書紀によると、「釈迦仏金銅像一体 幡蓋若干 経論若干巻」だったそうです。金剛像を見た欽明天皇(聖徳太子のおじいさん)は、大層心惹かれたそうです。金剛像とお経の巻物と、その他の仏具とは聞いていましたが、その仏具というのが幡蓋だったことを今回初めて知りました。想像ですが、欽明天皇は、光り輝く金剛像もさることながら、はためく色鮮やかな幡にも心躍る気持ちになられたのではないでしょうか。幡というのは、お祭りの時などもそうですが、風にはためいて、人の心を高揚させます。


写真は2011年に法隆寺で行われた聖徳太子1390年御聖諱法要で使われた現代の幡です。法隆寺にはもっとすごい金銅製の潅頂幡が伝わっており、これを復元したものを東京上野の法隆寺宝物館で見ることができます。

正倉院の大幡は、757年5月2日に東大寺で行われた聖武天皇一周忌斎会の時に用いられたそうです。この法要には1500人の僧侶が参列し、大変盛大なものだったそうです。大幡も少なくとも10本、それより小ぶりの道場幡は600本以上並んでいたそうです。大幡は今残っているのは4メートル余りですが、元は幡脚も入れると15メートルにもなったそうですから、それが10本以上並ぶと圧巻だったに違いありません。しかも、1周忌斎会は奈良の都だけではなく、地方26か国の国分寺国分尼寺でも行われたそうで、そのために丈六の仏像がまだできていない所は急いで完成させよとのお触れが前年の6月3日に出ています。そして12月20日には、潅頂幡1と道場幡29首のセットが既に26か国に送られました。聖武天皇が亡くなって1年の間に一周忌の準備は都と地方において着々と進められ、当日はそれはそれは見事に華やかな法要が営まれたのでした。


大幡を作る職人さんたちはきっと、気合を入れて頑張ったことでしょう。地方へ送る26本は12月までに、東大寺で使う10本以上は翌年6月2日までに仕上げなければなりません。錦や綾などの豪華な材料を集め、色を吟味して、手分けして作業が進められたことでしょう。

組紐は一間組です。幡頭の三角形の部分は山道柄ですが、山道は直線ではなく、緩やかなカーブを描いています。1992年発行の「日本の美術1 No.308 組紐」の解説で、当時の道明社長の山岡一晴氏は、「高台ではあのカーブはできません」と述べておられます。私がクテを使って組んだ一間組もよく似たカーブを描いています。


当時はどんな道具を使ってどんな工房でどんな職人がどんなことを思ってこれらの組紐を組んだのでしょうか。

It is autumn, a season of exhibitions.  In Nara, Shosoin Exhibition is held every year.  Last year I went there to see the ritual banner decorated with kumihimo.  A large banner, 458 cm in length and 90 cm in width, was laid down in a glass case.  It did have a full-blown dignity.  I could observe the banner through the glass to my heart’s content. I would have been happier if I could have turned the banner to see the backside of it as well.  Some parts were severely damaged and were protected with white threads.  The main body of the banner was appliqued with red and blue.  So the matching kumihimo must have been in vivid colors when it was made.  The braids were braided in ikkengumi (single-unit braiding) with strongly twisted threads.  I also attended a lecture by Mr. Ken Shimizu of Nara National Museum, which I found very interesting and I am going to tell you about it.

Banners originated in ancient India, and came to Japan through China and Korean Peninsula.  They were indispensable ritual ornamental articles for Buddhist services.  Officially, Buddhism came to Japan in 552 when Seong of Baekje in Korean peninsula sent “a gilt bronze statue of Buddha, some banners and some Buddhist sutras” to the emperor in Japan. Then Emperor Kinmei was deeply moved when he saw the golden statue.  Though I knew about the  statue, sutras and some ritual articles, it was my first time to learn that the “ritual articles” in fact mean banners!  I can imagine how much Emperor Kinmei was attracted not only to the shinning statue but also to the flapping colorful banners.  Banners usually, like in festivals in Japan, flap to the wind and uplift our feelings.


The photo shows a modern banner used during the 1390th death anniversary of Prince Shotoku in Horyuji in 2011.  In fact Horyuji has a much gorgeous gilt bronze banner, whose replica can be seen at the Horyuji Treasure Museum in Ueno, Tokyo.

According to Mr. Shimizu, the banner in Shosoin was used during the first death anniversary of Emperor Shomu on May 2, 757 in Todaiji.  This memorial service was attended by 1500 priests and was an outstanding big Buddhist event.  There were at least 10 banners like this, and over 600 dojobans which were smaller than this one.  Though the remain of this existent large banner is only a little over 4 meters long, the original banner was over 15 meters long including banner legs.  So we can imagine what a sight to see it was with 10 banners standing in a row. 

What is more, the service of the first death anniversary was held not only in the capital of Nara, but also in National Buddhist temples in 26 local counties.  In order to highlight the memorial service, the government at that time ordered the 26 counties on June 3rd in the previous year to build a 4.85-meter tall Buddhist statue if they had not built one yet.  On December 20th that year, a set of one large banner and 29 dojobans were sent to each National Temples.  The preparation for the memorial service was carried out surely and steadily both in the capital and in local counties.  The memorial service must have been a really spectacular event.

Craft people must have worked hard for the banners.  They had to finish 26 banners for the counties by December and over 10 by June 2 the following year.  They gathered expensive materials like brocades and twills, carefully selected colors and broke into teams to get on with the jobs. 

The braids are “Ikkengumi (single-unit braiding)”.  The top triangular part is decorated with mountain-path pattern kumihimo, but the path is slightly curved instead of straight.  In “Arts in Japan, No. 308 Kumihimo” published in 1992, Mr. Kazuharu Yamaoka, then President of Domyo Kumihimo Company, said “this curve cannot be made with Takadai.”  The photo below is a ikkengumi I braided with kute.  It shows similar curves.


I wonder what kind of people braided these banner braids using what kind of tools in what kind of places thinking about what?

2017年10月9日月曜日

二連角組その2 Double Kakugumi AADD Part 2

今日はまず、私のネタ本を紹介します。木下雅子著クテ打組紐技法研究会編纂発行の「クテ打組紐技法入門」およびその続編計3冊です。おそらく大きな図書館にあると思いますので、探してみて下さい。CDも付いています。表紙のカラー写真がとてもきれいです。分かりやすい文章と図解で丁寧に説明してあります。
さて、その中から二連角組を組んでみました。


緑と薄い黄色の単色ループ14本を使った2色組です

①①②②②②①    ①①②②②②①
         左手     右手  
 
これを変形したのがその下の2本です。
赤系   ④④①①①①② ④④③③③③②
               左手     右手 

紫系      ⑦①①②②③③  ⑦⑥⑥⑤⑤④④
                                     左手     右手


暈繝です。このまま帯締めにもできそうですね。ポシェットの紐などにも使えます。


次に、「クテ打組紐技法」からもう2つです。一番上は、緑とベージュの単色ループ14本を使った2色組です。緑が縁取りになっています。     
      ②①②①②①②  ①②①②①②①
                                    左手     右手

続いては、2色ループを使いますので、少し複雑です。矢羽が2列並びます。    
                    
①②①②①②①  ①①①①①①①
                     ②①②①②①②     ②②②②②②② 
         左手     右手

この組方の裏を見て3番目のパターンを考えました。2色ループを2種類14本使います。配色を変えていろいろ楽しめます。写真では、①緑、②肌色、③ベージュ、④茶を使いました。

                       ①②①②①②①  ②①②①②①②
                       ③④③④③④③  ④③④③④③④
                                        左手       右手


以上は、あくまで左手から操作を始めることを前提にしています。どうしても右から始めたい人は、配色図の鏡像を使ってください。
配色図は、色別に①②③のように数字で表しています。最初はカラーでのように表記していたのですが、色数が増えると判別しにくくなるのと、白黒の方が自由に配色を考えやすいと思って、今のようにしました。


Today I would like to introduce my material books.  It is “Introduction to Kute-uchi Kumihimo Technique” written by Masako Kinoshita and published by Kute-uchi Kumihimo Technique Research Group.  It is a three-volume series with beautiful color covers and a CD.  Perhaps you can find it in major libraries in every prefecture in Japan.  It is in Japanese.  The books explain in plain Japanese and clear graphics.


From the books, I tried Double Kakugumi, which uses 14 single-color loops in two colors (green and yellow).  
      ①①②②②②①     ①①②②②②①
         Left       Right  

 
I modified this and made two more braids.

Reddish one ④④①①①①②  ④④③③③③②
       Left        Right 


Purplish one ⑦①①②②③③  ⑦⑥⑥⑤⑤④④
       Left        Right  


These are Ungen.  How about making a string for a pochette?


Two more braids from the books.  The top one is made with 14 single-color loops in green and beige.  The green color edges the braid.
     ①②①②①②①  ②①②①②①②
        Left       Right 

  
The second one is made with 14 bi-color loops, which is more complicated. It makes two rows of chevrons. 

     ①②①②①②①  ①①①①①①①
     ②①②①②①②     ②②②②②②② 
                Left        Right  

When I saw the back side of the second one, I got an idea for the third one.  It is made with 14 bi-color loops in four colors.  You can enjoy various color combinations.  The one in the photo is made with ①green, ②flesh color, ③beige, and ④brown.

   ①②①②①②①   ②①②①②①②
   ③④③④③④③   ④③④③④③④
    Left           Right  


All the instructions are based on the assumption that you start with your left hand.  If you want to start with the right hand, please use the mirror image of the charts. I use ①②③ for different colors.  I initially used color charts like , but I have changed it because colors get confusing when I have more than 3 colors.  Besides, black-and-white charts, I thought, will allow you to make your own color combinations more freely.