ラベル 角組 Kakugumi の投稿を表示しています。 すべての投稿を表示

2022年2月21日月曜日

斜格子一間組でバッグ持ち手  Oblique Lattice Single-unit braiding


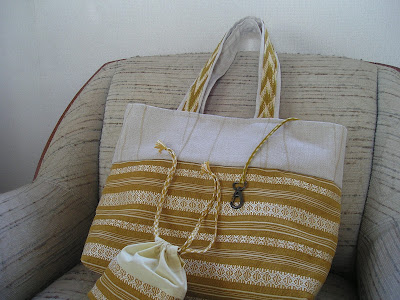
久しぶりのブログ更新です。プレゼント用に、ヤフオクでゲットした夏の博多帯(黄色)とカーテン地でバッグを作りました。同じ帯地を使って以前も作りましたが、今回は組み合わせたカーテン地との配色がさわやかな感じに仕上がりました。持ち手は以前のは真田紐でしたが、今回はクテ打ちで斜格子一間組です。鍵をぶら下げる紐は角組(CC)、残った帯地で作った巾着の紐はハマナカのアプリコで重打(CD)です。アプリコはコットンキングより細く、繊細に仕上がります。ベージュはラメ入りで豪華になりました。


Long time no see.  I made a bag using a yellow Hakataori kimono-sash for summer which I got through Yahoo Auction and curtain material.  I made another bag with the same Hakataori sash before.  This time, I matched it with  different curtain material, which gave the bag brighter impression.  The handles are Kute-uchi oblique lattice single-unit braiding, though the last time it was Sanada-gumi.  The key-holder is Kakugumi (CC) and the braids for the drawstring bag is Shigeuchi (CD) with Hamanaka’s Aprico.  Aprico is finer than Cotton King and the finished braids are more delicate.  The beige thread is spun with gold lame giving the whole braid a gorgeous look. 


2019年8月8日木曜日

巾着袋用茶斜格子一間組  Flat braid in an oblique plaid of brown for a drawstring bag


最高気温が38度という暑さの中、ややこしいことはする気がしないので、簡単な巾着袋を作りました。中身の見える透ける素材で袋を作れば、中身が見えて便利だろう、と前から思っていたのですが、ちょうどカーテン素材の中に、レースカーテン用の適当なものがあったのと、20年ほど前に横浜の祭り用具店で買った、半纏用帯の生地を組み合わせました。透ける素材というのは、縫い代の始末をきちんとしないと表から見えるので、予想以上に仕立てに手間取りました。

「さてこれに合う紐は」と、考えるのが一番楽しい時間です。今回はあまり厚みの出ない、平組一間組にしました。さらに薄くなるようにと、コットンクイーンを2本取りで使いました。7ループです。長さは、55cmは欲しいので、長さの中央から組み始める方法を取りました。この方法は、中央のつなぎ目が目立つのですが、今回は紐の中央は紐通しの中にあるので目立ちません。

必要な長さを組み終えると、両方のクテ14本を合わせて角組を7回ほど組みました。これで紐が輪になります。ただし、このためには、半分の長さを組んだ時点で、まだ組んでいない方の糸を巾着の紐通しに通しておかなければなりませんので注意が必要です。 

平組は2つ折りにして組むので、下の半分が良く見えないため、斜格子が左右対称にならず、曲がってしまいがちです。今回は、1サイクル終わるごとにきちんとひし形になっていることを確認しながら進めました。


We have the highest temperature of 38 degrees centigrade for a few days.  It is hard to tackle any complicated projects.  So, I resorted to making a small drawstring bag.  I had long wanted to make a bag with a see-through material so that you can see the contents easily.  I found an ideal material among my pile of curtain materials.  I also found a matching material of some 20 years old which I bought at a festival costume shop in Yokohama.  As soon as I started sewing, I realized that see-through materials need special caution because you can see the seam allowance from outside.  It took me longer to finish a small bag than I had expected.


“What kind of braid will match this bag?” It is the most fun part of the whole process.  This time I decided to make a thin flat braid of single-unit braiding with 2-strand Cotton Queen.  I made 7 loops.  Since I need a length of 55cm, I started in the middle of the length, turned around, and finished the second half of the length.  With this method, the center connection does not look good, but it is OK this time because the connection is hidden in the casing.

When you finish braiding, bring all the 14 Kute together and do Kakugumi 7 times to makes the braid a loop.  But do not forget, when you finish the first half of the braid, to put the remaining half through the string casing and continue braiding.

This flat braid is two-fold, and you cannot see the lower part very well, often resulting in warped diamond shapes.  So, I checked the backside everytime I finished a cycle and proceeded.

2019年3月25日月曜日

四層構造四連角組 中尊寺の紐 4-layer quadruple Kakugumi Chusonji Temple’s braid


四連角組の3つ目は、中尊寺に伝わる藤原秀衡(1122?~1187)の棺中の紐です。ということは、ミイラと一緒に入っていたということでしょうか。


これも36ループですが、すべて単色です。木下先生の「日本組紐古代技法の研究」では、カラー写真の27、模式図1-6-16、径路図および色糸配置1-6-17、1-6-18、1-6-19、本文p123に出ています。今回は3つ目ということもあり、最初からあまり間違えずにすんなりできました。

AADDを連結します。これまで試みた3つの四連角組は、それぞれ連結の仕方が少しずつ異なります。ここでは、外側のAをした後、内側のAをする前に、左右の組手のループを1度交換、もう一度交換し、もとのループを受け取ってAをします。これを木下先生は「反転連結」と呼んでおられます(1度だけ交換するのは単純連結)。反転連結では色の配置は変わりません。Dをするときは連結なしです。先生が言われる「半連結」です。したがって、色の配置を変えないときは「反転半連結」です。 

色を変える時は、「全連結」をします。すなわち、AとDともに内側のループを交換してから内側を組みます。先生はこれを「単純全連結」と呼ばれます。

全部で36ループ(片手に9ループずつ)ですから、反転半連結と単純全連結を9回ずつ繰り返して1パターンです。これまでの2つの四連角組は上下の面に模様が出ましたが、この紐は側面に模様が出ます。最初は上面だけを見て失敗したのかと思いましたが、ちゃんと側面に模様ができていてほっとしました。とても美しい模様ですね。配色をいろいろと工夫するのも楽しいでしょうね。全連結をすると、ねじる回数が増えるからか、用意した糸の長さはこれまでと同じなのに、でき上がった紐は短くなりました。 

略号A, B, C, D については、「クテ打ち手操作基本の4操作」をご覧ください。


My third quadruple Kakugumi is a braid found in the coffin of Hidehira Fujiwara (1122?~1187) in Chusonji temple.  Since Hidehira’s body was mummified, this braid was kept with a mummy.


This braid consists of 36 single-color loops.  In Kinoshita sensei’s book “Study of Archaic Braiding Techniques in Japan” it appears in #27 in color page, diagram 1-6-16, track plan and initial color allocations 1-6-17, 1-6-18, 1-6-19 and on the main text p. 123.  This braid being my third one, I could braid very smoothly without too many mistakes this time.

Two braiders braid AADD and they exchange the inner loops.  The exchange is done in different ways in the 3 types of quadruple Kakugumi I have done so far.  Here after A with the outer loop, braiders exchange the inner loop once and one more time, meaning that each braider receives the original loops.  Then inner A.  Kinoshita sensei calls it Linked Interconnection (When two braiders exchange loops only once Sensei calls it Simple Interconnection).  With Linked Interconnection, the color arrangement does not change.  D is performed without interconnection, Kinoshita sensei calls it Partial Interconnection.  Therefore the operation for no color-change is Linked Partial Interconnection.

It is Total Interconnection when you want to change colors: meaning you braid both A and D inner loops after exchanging them (only once: simple) with your partner.  Sensei calls it Simple Total Interconnection.

Since you have 36 loops (9 loops in a hand), you repeat Linked Partial Interconnection and Simple Total Interconnection 9 times each to make one pattern.  My last two quadruple Kakugumi had beautiful patterns on the top and bottom of the braid, but this braid has beautiful patterns on two sides.  I was disappointed in my first trial not to find nice patterns on the top, but relieved to find beautiful patterns on both sides.  They are really beautiful!  We can enjoy them by changing color arrangements.  Perhaps because Total Interconnection requires more twisting of loops, the finished braid is shorter then the previous 2 braids though the material threads are the same length.  

For the abbreviations A, B, C, D, please refer to "Kuteuchi Basic 4 Movements" .

2019年3月6日水曜日

四層構造四連角組 4-layer quadruple Kakugumi


長い間かかってようやくでき上がりました。36ループの四連角組です。木下先生の本「日本組紐古技法の研究」のカラーページの写真23と27、図1-6-20、図1-6-21、および本文125ページの「鞆淵八幡宮蔵・沃懸地螺鈿金銅装神輿の総角」です。神輿は国宝に指定されています。


全長49cm、幅約8mm、厚さ約7mmの角ばった紐になりました。素材はコットンクイーンの2本取りです。


基本的には、1人が左右に9ループずつ持ち、2人で36ループです。AACCを9回、AADDを9回してワンパターンですが、AACCでは上下2本に分かれてしまうので、木下先生は工夫して、CCではなく、ECとされています。Eは、中通し閉のDをもう半回転して、「ひねりは入るが配色は変わらない」という便利な操作方法です。そのため、実際には、AAECを9回、AADDを9回行います。

これを1人でするわけですが、それがつい間違えてしまうのです。今回は、私のモットーである「やり直しができて一人前」を実践するために、間違いを見つけるたびにほどいてやり直しました。そのやり直しがややこしい。組んでいる時間より、解いている時間の方が長かったです。でも、作品を作る時には少しの過ちも許されないので、やり直しができることが大切です。以前、組紐組み物学会のワークショップで小島先生が、「解く時も、1動作ずつ逆に戻る」とおっしゃっていたのを思い出し、解く手順も手に覚えさせました。

1本目の紐を解いては組み、組んでは解いてをさんざん繰り返し、糸もかなりくたくたになった後、新しい糸で2本目の紐を組み始めると、驚くほど間違いもなく進みました。たまに間違えても、慌てることなく、少し解いてからまた組み直せるようになりました。そうして約3日ほどででき上がった2本目が写真でお見せしているものです。

今回もかなり手こずりましたが、ようやく要領が分かってきました。


略号A, B, C, D については、「クテ打ち手操作基本の4操作」をご覧ください。


After a long time trying, I have finished a 36-loop 4-layer quadruple Kakugumi.  It is shown in Kinoshita-sensei’s book "Study of Archaic Braiding Technioques in Japan": photos 23 and 27 on color pages, diagram 1-6-20, track-plan 1-6-21, and the Japanese text on page 125 and the English summary on page 329.  It is called “the braids for the lover’s knot decoration for the gilt copper sacred palanquin with inlaid mother-of-pearl decoration at Tomobuchi Hachiman Shrine”.  The palanquin is designated as a national treasure.  

My braid is approx. 49 cm long, 8mm wide and 7mm thick.  The material is Cotton Queen.

Basically, it is a 36-loop braid for two braiders holding 9 loops on each hand.  One cycle is AACC 9 times and AADD 9 times.  However, AACC results in two separated braids.  Kinoshita-sensei’s suggestion is to give D one more half-twist and she calls it E.  E is convenient when you want to turn a loop without changing colors of a bi-color loop.  Therefore, the actual one cycle is AAEC 9 times and AADD 9 times.

Not so difficult for two persons, but extremely confusing for a solo-braider. I kept making mistakes.  In order to produce a perfect braid, no mistake is allowed, and you have to learn how to correct mistakes.  My principle is “You do not fully understand how to braid without being able to undo it.”  So whenever I found a mistake, I undid it.  The undoing was super complicated.  I spent more time undoing than braiding.  I remember Ojima-sensei of Japan Braid Society once told me in one of her workshops that you have to undo a braid step by step in a correct reverse order.  So I let my hands learn how to undo a braid step by step.

My first braid was worn out after repeating braiding and undoing many times.  Then I took a second set of 36 loops.  This time it went amazingly smooth.  Even when I made a mistake, I could calmly undo it and start again.  It took me only 3 days to finish my second braid which is in the photo.

It was not easy this time again, but gradually I am Learning. 

For the abbreviations A, B, C, D, please refer to "Kuteuchi Basic 4 Movements" .


2018年8月6日月曜日

四連角組 Quadruple Kakugumi


奈良国立博物館で開催された「春日大社の秘宝展」で、「赤糸威大鎧」を見て、その繰締緒が亀甲模様だったので、次の挑戦はこれと決めました。しかし、木下先生の「古代組紐技法」で調べてみると、1人が18本のクテを持ち、4人横に並んで組むという大掛かりなものでした。これには恐れをなして、もう少し少ないクテでできる四連角組に方向変換しました。クテは28本です。西大寺蔵の釈迦如来像体内納入経巻錦袋の紐のパターンだそうです。

二連角組AADDを2つ合わせたもので、だから四連角組と呼びます。木下先生の本では、2人で組むように想定されています。AADDをしてから2人で内側の糸を交換するのかと思ったのですが、そうではなく、1回目(外側)のAが終わった時点で、次のA(内側:パートナーに近い方)をする前に交換し、パートナーからもらったクテで次のAを組みます。次に外側のDを組んでからまた、次の内側のDを組む前に交換し、パートナーからもらったクテでDを組みます。

これを1人で組むには多少のアレンジが必要です。できるだけクテを持ち替える回数を少なくするように工夫しました。10ステップで1サイクルです。

いつものように、何回か失敗した後、何とかお見せできるようなものができました。

しっかり角ばっています。かなり苦労しましたが、こんなに美しいパターンが自分の手でできるのは、感動です。AADDでできるパターンを2つ組み合わせれば、いろいろと楽しい模様ができそうです。


At Nara National Museum, I saw the exhibition of “Treasures of Kasuga Shrine” and was especially attracted by a Kikko pattern braid which was used as a belt of a Japanese armor.  Instantly I decided that my next challenge would be Kikko pattern.  However, according to “Study of Archaic Braiding Techniques in Japan” by Kinoshita-sensei, the pattern needs 4 braiders, each holding 18 Kute.  It is too challenging for me.  I turned around and chose a Quadruple-Kakugumi with 28 Kute.  The pattern is from a bag braid for sutras hidden inside a statue of Buddha in Saidaiji temple in Nara.

The pattern is basically double AADD, therefore called Quadruple-Kakugumi.  Kinoshita-sensei explains in her book that the braid be made by two braiders.  I visualized two braiders exchanging the innermost (closest to the partner) Kute after doing AA and DD.  I was wrong.  You do A with your outer hand and exchange the innermost Kute with your partner and do A with that Kute you just received.  Then you do D with your outer hand and exchange the innermost Kute with your partner and do D with that Kute you just received. 

In order to do this process alone, you need to arrange the steps.  I came up with 10 steps for 1 cycle. 

As always, after making many mistakes, I finally braided something good enough to be photographed.  Very square!  Though I struggled, it is amazing that I can make such a beautiful pattern with my own hands.  With other color arrangements many other patterns are possible!

2017年8月9日水曜日

2色ループで組む  Braiding with bi-color loops


写真の紐はどれも2色ループで組みました。2色ループとは、ひとつのクテの両端に異なった色の糸をつけたものです。面白い結果が出ますから、是非いろいろと試してみてください。


上の茶系の紐の最初の色配置はこのようになります。


●●●●  ②②①①

③③④④  ●●●●

左手    右手


ビデオの最初の部分では、同じ配色の2色ループが2本ずつできます。この方法では奇数の2色ループはできません。奇数の場合は、ビデオの終わりの方でお見せしているように、私は細い糸(生川商店のコットンクイーン)を2本取りで使っています。刺繍糸だと、好みの太さに調整しやすいですね。 この方法だと、2色ループが偶数でも奇数でもできます。

A bi-color loop is a loop with a different color thread on each end of Kute.  We can make unexpected patterns with bi-color loops.  Please try with different color combinations.

Below is the initial color setting for the brown braid. 

●●●●  ②②①①

③③④④  ●●●●

Left hand   Right hand


The first part of the video shows how to set even-numbered bi-color loops.

However, this method does not work with odd-numbered loops. 


When I work with odd-numbered bi-color loops, as I show toward the end of the video, I use finer threads and double them.   The embroidery floss is also usuful.  It is easy to adjust the thickness .  This method can be used both for even- and odd-numbered loops.

2017年7月26日水曜日

角組3 Kakugumi 3


なぜ角組で、ループ数が奇数の時はほぼ正方形の断面ができて、偶数だと台形になるのでしょう。直感的には反対ではないかと思ってしまいます。この疑問は、実際に組んでみると氷解しました。

7本ループで組む場合を考えてみます。左手に4本、右手に3本持つところから始めます。余談ですが、私は奇数のループで組む時はいつも左手に多い数のループを持つことに決めています。そして、いつも左手の左端のループから動作を始めることも決めています。これは、途中で今自分はどの操作をしているのか分からなくなった時に役立ちます。

話を元に戻します。左手人差し指で一番外側のループを持ち上げ、右手でそれを上から受け取ります。この時、移動するループは、左手に残っている3本のループを外側から越えて右手に移ります。次に右手人差し指で一番外側のループを持ち上げ、左手でそれを上から受け取ります。この時も移動するループは、右手に残っている3本のループを外側から越えて左手に移ります。左右同じ数のループを越えるので、左右の側面が同じ幅になります。

偶数のループ、例えば8本ループの場合を考えてみます。左右に4本ずつループを持ちます。左手一番外側のループは、左手に残った3本のループを越えて右手に移ります。右手には5本のループがあります。今度右手一番外側のループが左手に移りますが、この時右手に残っている4本のループを越えます。左右で越えるループ数が異なるので、側面の幅も変わってきます。

組紐に限らず、手作業では、頭で考えるより、手で考えた方が分かりやすいとよく言われますが、これもその良い例だと思いました。
文鎮に角組 Kakugumi with a paperweight


Why are Kakugumi with odd-numbered loops almost square in cross-section while those with even-numbered loops are trapezoid?  My sixth sense tells me the other way round.  This question was, however, resolved almost as soon as I actually started braiding.

Take a case with 7 loops, 4 loops in the left hand and three in the right to start with.  Though this is off the subject, I make it a rule to hold more loops in the left hand than in the right hand, when I work with odd-numbered loops.  Also I always start with the left hand loop. These rules are useful when you get lost in the middle of manipulation.

Back to the track.  You raise the outermost loop in your left hand with the left index finger, and you take it with the right hand.  In the process, the moving loop goes over 3 loops remaining on the left hand and is settled in the innermost of the right hand.  Then you raise the right outermost loop with the right index finger, and receive it with the left hand.  Again, the moving loop goes over the remaining 3 loops on the right hand.  Because both outermost loops go over the same number of loops, they make equally wide sides.

Now let’s take an even-numbered loop, for example, an 8-loop case.  You hold 4 loops each on both hands.  The outermost loop on the left hand goes over the remaining 3 loops and is settled on the right hand.  Now you have 5 loops on the right hand.  Next, when the outermost loop on the right hand moves, it goes over the 4 loops remaining on the right hand.  Since each outermost loop on both hands goes over different number of loops, the width of the both sides is different.

It is often said that when you work with hands, not just Kumihimo but in any handicraft, it is easier to think with hands than with the head.  I thought this is a good example of the saying.

2017年7月24日月曜日

角組2 Kakugumi 2


角組はかっちりとして実用的で、しかも美しい組み方です。正倉院にも数多くの角組の組紐が残されています。画像が小さくて見にくいのですが、正倉院の宝物データベースに小香袋が載っています。可愛い小袋ですね。ちょっと真似して作ってみたいと思わせます。


写真の上2本は、ビデオで作っていた2色の角組と同じもの、一番下の茶系のものは、これも正倉院の組紐を真似て作ったものです。これは、ループの上と下の糸が異なる2色ループで組んでいます。この作り方は近いうちに説明します。

私は台組みの経験がないのですが、台で角組を組むには4の倍数の要素数(ループの場合は1ループが2要素になる)で組むのが通常だそうです。しかし、昭和48年(1973年)に平凡社から発行された「正倉院の組紐」によると、当時調査された正倉院の240例の角組の内、要素数が4の倍数ものは78例、奇数の倍数のものは160例と圧倒的に奇数の倍数のものが多いそうです。私たちは8本のループ(要素数16)で角組を作りましたが、奇数の倍数(10,14,18、すなわちループ数で言うと5,7,9本)で組むことももちろんできます。従って、正倉院の角組はループ組紐の手法で組まれたと、木下雅子先生は書いておられます。(正倉院紀要第31号)

実は、8本ループの角組の断面は台形をしています。4面の内、広い面と狭い面が向かい合っていることに気づきます。ところが、7本や9本のループで組んだ角組の方がより正方形に近い断面になります。是非比べてみてください。従って、きれいな角組を組みたければ、奇数ループで組む方が良いわけです。これも、正倉院の角組がループ組紐の手法で組まれたとする根拠の1つに木下先生は挙げておられます。さらに2つの根拠を木下先生は挙げておられますが、何しろ私は台組ができないものですから、よく理解できておりません。台組をしておられる方々は、是非この論文を読んでみてください。

深く理解できないながら、ループ組紐が奈良時代あるいはそれ以前の昔から用いられた手法であり、この手法で組まれたものを、今も私たちは、ガラス越しではあるものの、見ることができるということに、私はロマンを感じます。そして、自分が今動かしている手の動きは、古代の組紐製作者らと同じだと思うと、何だか、時代を超えた仲間意識すら感じてしまいます。 

さらに、角組は世界中で組まれてきたそうです。話は大きくなるので、今日はここまでといたしましょう。

Kakugumi is not only a strong and practical braid, but also it is beautiful.  In Shosoin (the ancient treasure warehouse attached to Todaiji (Great Buddha) Temple in Nara which dates back to the 8th century), a number of Kakugumi Kumihimo are preserved.  One of them, though not very clear, is a small incense bag  which we can see from the Shosoin Database.  A lovely small bag that makes me feel like sewing and braiding a similar one myself.


The two top ones in the photo are the same Kakugumi that I made in the video, and the bottom one I made copying another treasure Kakugumi from Shosoin.  I will explain how to make it in the near future.

I do not have an experience of braiding with Marudai, but I read that in order to braid Kakugumi with Marudai, you usually use multiples of 4 elements (in case of loop braid, one loop has two elements) .  However, according to the book “Braids in the Shoso-in” published in 1973 by Heibosha, among the 240 Kakugumi braids in Shosoin that they had examined, there were 78 braids with multiples of 4 elements whereas 160 braids were made with multiples of odd-number elements, overwhelming majority! 

Though we have practiced an 8-loop Kakugumi, we can easily make a Kakugumi with multiples of odd-number elements (10, 14, and 18, which are 5, 7, and 9 loops). Based on this fact, Masako Kinoshita Sensei writes in her paper submitted to Shosoin that Kakugumi restored in Shosoin were made using loop braiding techniques.  I am afraid I could not find the English translation of the paper.

In fact, if you look at an 8-loop Kakugumi carefully, you will notice that it is trapezoid in cross-section. It has a wide and narrow sides facing each other.  On the other hand, the braids with 7 or 9 loops are more square in cross-section.  Please compare your Kakugumi.  Therefore, if you want to make a fair square Kakugumi, you would choose odd-number loop Kakugumi.  This is another reason why Kinoshita-sensei believes that Shosoin Kumihimo are made using loop braiding technique.  She also shows two more reasons to support her idea.  But unfortunately because of my lack of Marudai experience, I do not quite understand her points.  I recommend that those who can braid with Marudai should read her paper.

In spite of the fact that I do not fully understand her logics, I am still fascinated that loop braiding is a very old technique going back over 1300 years, and the resulting works we can still watch today, though through glass, at the Nara National Museum.  Besides, when I think that the movements of my braiding fingers are the same as those of the ancient braiders, I even feel some kind of comradeship with those unseen craftsmen and craftswomen.

I also heard that Kakugumi has been braided for a long time all over the world, but the story is long and I would like to call it a day now.

2017年7月20日木曜日

角組 Kakugumi

基本動作「B:外回り閉」で角組を組みましょう。名前のとおり、角に組みあがります。初めは、分かりやすいように、左右色違いの2色の糸でやってみます。綺麗な矢羽.根模様ができます。

これから色々なサンプルを作っていきますが、私はそれらを整理するのに、いつも紐の初めに輪を作っています。これがあると、同じ組み方の紐を集めたり、何かに取り付けたりするのに便利です。ビデオではその初めの輪の作り方から説明します。


ビデオではセミがうるさくて申し訳ありません。

2色の矢羽根ができたら、次は色の組み合わせを変えて、いろいろ作ってみてください。思いがけない面白い模様が出来上がります。クテの扱いに慣れてくれば、クテを増やして、9本、10本でやってみて下さい。その時に、必ず記録を取っておいて下さい。後になって、あの時はどうやったのだろうと、悩むことのないように。記録の取り方は簡単です。例えば、ビデオで作った紐は、左右色違いの8本ですから、●●●● ○○○○  と書いておきます。

We are going to braid Kakugumi using the Basic Movement B: Open & Cross.  Kaku means square and the braid has a solid square structure.  We begin with two different colors, 4 threads in dark color on the left hand and 4 in light color on the right.  We are going to have nice V-shaped chevron patterns.

As we plan to make various samples, we need to organize them nicely.  For that purpose, I always make a circle at the top of a braid, which comes handy when sorting out braids or attaching braids to something.  I am going to show you in the video how to make a circle.

--- Video ----

I apologize that you hear cicadas singing in the background.

Having made a bi-color chevron braid, we can try other color combinations.  You will be amazed to find unexpected nice patterns and color-combinations.  When you are comfortable with 8 Kute, you can make another Kute and more to try 9 and 10 Kute braids.  Please make it a rule to keep records of your color combination patterns so that later you do not wonder how you came up with such a nice pattern.  It is easy.  For example, the braid in the video is made with 4 dark and 4 light colors, so you write ●●●● ○○○○.