2018年12月17日月曜日

紫茶斜格子一間組 Purple and Brown Oblique Lattice Single-unit braiding


裂き織のバッグの持ち手を組みました。一間組です。これまでは、組目がはっきり見えるように、反対色などのコントラストの強い色を合わせて組んできましたが、今回は以前に織った裂き織布に合わせて、紫と茶の濃淡計415ループで組みました。こういう配色もいいなと思いました。使用糸はコットンキングです。


長さは55cmは欲しいので、90cmの糸を用意し、長さの中心から組み始めて端まで組み、中心に戻って反対側を組みました。写真でも分かると思いますが、糸が長い時ほど、締める力が弱いので1パターンの長さが長く、糸が短くなってくるとしっかり占めることができるので、1パターンの長さが短くなっています。パターンの長さは最大約1cmの差ができてしまいました。糸の長さに関わらず同じ強さで締めることができるようにならなければ。
 

長い紐を組むもう一つの方法として以前に紹介した、 Ingrid Crickmore のキャタピラーのやり方があります。今回もどちらにしようかと迷ったのですが、幡垂飾でやり慣れた方法を選びました。

でき上がりは、2.6cm55cmになりました。バッグも仕上がりました。底の部分にはカーテン生地の端切れを使っています。


Braided a pair of bag handles in purple and brown, using a technique of Single-unit braiding (ikken-gumi).  I have been using contrasting colors, like opposite colors, so that I can clearly see the braiding.  This time, in order to match the torn-yarn woven fabric that I made some time ago, I chose 4 colors, dark and light purple and brown, 15 loops.  This similar color combination is also nice, I thought. The material is Cotton King.

I needed the length of over 55cm.  So I prepared 90cm long threads and started from the center of the length, braided till the end, and started from the center again to the other end.  As you may be able to see from the photo, the length of the pattern varies.  When you have long threads, your tightening power is weakened, making the pattern length longer.  With shorter threads you can tighten firmly and get shorter patterns.  The difference between the longest and the shortest was about 1cm.  I must train myself to be able to tighten with constant power regardless of the thread length.

Another way to braid longer braids is, as I discussed showing Ingrid Crickmore’s method, Catapilar.  After wondering which is easier, I opted for the center-start which I got used to with Bansuishoku.

The finished braids are 2.6cmx55cm.  I also finished the bag.  The bottom part is a curtain remnant.

2018年9月30日日曜日

2人で四連角組 Dueted Quad Kakugumi


1人で四連角組を間違えることなくできるまで、かなり練習しました。慣れてしまえば面白いようにできるのですが、それまで何度間違えてやり直したことか。昨日はクテ打ちの仲間2人に2人操作で四連角組をしてもらいました。ビデオに撮りましたので見てください。


1人だと、1サイクル10ステップですが、2人だと6ステップで、とても速いです。2倍以上速いと思いました。本当は1サイクル終わるごとに、組みあがった部分の近くを手にもって引き締めるのですが、3人しかいなくて、私がビデオカメラを持っているので、引き締めていません。

いつも一緒にクテ打ちを楽しめるパートナーが近くにいてくれるといいのに、と思いました。


I had to practice a lot to be able to braid Quad Kakugumi alone.  Once you get used to it, you can braid smoothly, but you need to make countless mistakes before reaching that stage.  Yesterday, I had a chance to meet my Kute group members and asked them to braid Quad Kakugumi in pair.  Here is the movie. 

You need 10 steps when you braid solo, whereas 6 steps are enough for a pair.  Thus it is very fast.  I had an impression that it was two times faster than solo.  In fact, I should have tightened after each cycle, but we were only 3 of us and I was filming with a video camera. So there is no tightening step in the video.

It would be wonderful if I had a Kute partner living in the neighborhood and could enjoy duet more often.

2018年9月21日金曜日

母とコラボ第2弾 Collaboration with Mother No. 2

リビングのレースカーテンが傷んで来たので、新調することにしました。カーテン屋さんへ行くと、ワゴンにカーテンの端切れがいっぱいあって、備えてあるビニール袋に入るだけ入れて500円ということでした。カーテン地はしっかりしていてバッグに丁度いい厚さです。ホクホク顔で帰ってくると、母がその中から気に入った生地を見つけて、ショルダーバッグに仕立てました。私は「紐は私にお任せ」と言って、唐組のサンプルを2つ作ったのですが、母が、「地味すぎる」と言って、OKがでません。それでは真田紐はどうでしょうと作ったものが合格でした。


これまで作った真田紐を並べてみました。市松模様も飽きてきたので、今回は雑誌で見た縦縞にしてみました。雑誌では男物の下駄の鼻緒に使っていたものです。なかなかきりっと素敵に仕上がりました。

Our living room curtains are worn out and we have decided to order new ones.  At a curtain shop, there was a wagon-full of curtain fabric remnants.  It costs 500 yen for a small plastic-bagful. Curtain fabrics make good bags. I stuffed the fabric as much as I could.  I came home smiling.  My mother chose one of them and made a shoulder bag with it.  I offered to make a belt and made two Karakumi samples.  She does not accept them saying “They are too quiet.”  Then I made a Sanadahimo, which she liked.


These are the Sanadahimo I have made.  I am getting tired of checkerboard patterns, so I made a stripe that I once saw in a magazine.  In the magazine, the braid was used as sandal thong for men.  I liked the sharpness of the pattern.

2018年8月13日月曜日

幡垂飾はなぜ強撚糸?  Why Bansuishoku with hard twist yarns?

現在の組紐は、絹糸をほとんど撚らずに組まれており、絹の艶やかさが引き立ちます。なのに法隆寺の幡垂飾はなぜ強撚糸で組まれたのか、独特のテクスチャを出すためかと、ずっと思っていました。その疑問に、先日奈良国立博物館「糸のみほとけ」展の公開講座で澤田むつ代先生がずばり答えてくださいました。講座の題は「飛鳥から奈良時代における刺繍と金糸の技法の変遷」です。


140927 Nara National Museum Nara Japan03bs5.jpg


奈良国立博物館
ウィキペディアより


先生によると、藤ノ木古墳の遺骸に掛けられていた「掛け布」も、飛鳥時代に作られたと伝えられる中宮寺の「天寿国繍帳」も、強撚糸で刺繍されているそうです。ところが、正倉院にある多くの刺繍は、撚りをかけていない引き揃えの糸がほとんどだそうです。刺繍の技法は、天寿国繍帳が返し繍いですべて埋め尽くされているのに対し、正倉院のものは、刺し繍い(ロング・アンド・ショート・ステッチ)や、平繍い、鎖繍い(チェーン・ステッチ)、駒繍いなどが駆使されていて、特に刺し繍いで見事な暈繝(グラデーション)をほどこしたものが多いとのことでした。

先生の説明によると、飛鳥時代の絹糸はまだ品質が良くなく、強度もなかったため、強い撚りをかけないと、刺繍することができなかったのではないかということでした。それが奈良時代に入り、艶やかで強度もある絹糸が生産できるようになり、その特徴を十分に発揮できる刺し繍いや平繍いが多用されたと言うことでした。おそらくこの技術革新は、遣唐使が中国から持ち帰った文献か、あるいは連れ帰った専門家によって可能になったのでしょう。しかし、それを裏付ける同時代の刺繍が中国に残っていないため、証明できないそうです。

もう1つ耳寄りな話がありました。金糸も飛鳥時代と奈良時代では違うそうです。法隆寺の幡垂飾にも金糸・銀糸が使われています。拡大写真で見ると、コイル状になったメタリックな細いリボンが見えます。絹の芯糸にコイルが巻き付いていたそうですが、芯糸は見えません。奈良時代には、金をさらに薄く延ばす技術が発達し、裏に和紙を張った金箔が作られました。これを細く切って絹の芯糸に巻き付けたのが、奈良時代の金糸です。金が薄いので、柔軟性があり、扱い易そうに見えます。薄いと言うことは、同じ量の金からより多くの金糸を作ることができます。

飛鳥時代の金糸は、金を細く切った切り口が鋭利なので、見るからに芯糸や他の刺繍糸を傷つけそうです。こうした金糸と一緒に組紐を組むとすれば、他の絹糸もしっかりと撚りをかけて丈夫にしなければなりません。

澤田先生のお話は刺繍の糸についてでしたが、私は組紐の糸に置き換えて、お話を聞いていました。

「糸のみほとけ」展は、當麻寺の綴織當麻曼荼羅の修理が終わったのを記念に、織物や刺繍の仏像を集めたものでした。當麻曼荼羅(縦横ほぼ4m)をはじめ、長さ2mを超える「国宝刺繍釈迦如来説法図(奈良時代)」や、スタインが敦煌からイギリスに持ち帰り現在大英博物館に収蔵されている「刺繍霊鷲山釈迦如来説法図」など、めったに見られないものがずらりと並んでいました。

うれしいことに、幡垂飾もありました。会期の前半は、白鶴美術館から、後半は藤田美術館からのものでした。どちらも赤を基調に、金、銀、黄、萌黄、紺を加えた、見慣れたものでした。私にとって目新しかったのは、個人蔵の古裂帖貼に、4列の唐組の一部があったことです。色の配列も要素数も他の幡垂飾と同じです。これの全体像は、見事なものだったでしょう。4人あるいは8人で組んだのでしょうか。

刺繍にしても織物にしても、奈良時代には既に、これほどの大掛かりな作品を1年くらいで仕上げることのできる高度な技術を持った職人集団が組織されていたと言うことです。まさに「咲く花のにおうがごとく」です。私の今の技術では、組紐職人として雇ってもらえないかも。

Present Kumihimo are braided with almost-non-twist silk yarns and  the sheen of silk yarns cuts a brilliant figure. But the Bansuishoku of Horyuji temple were braided with hard-twist yarns.  Why?  Is it in order to create a unique texture?  My long-standing question was solved instantly when I attended a lecture meeting of Ms. Mutsuyo Sawada held at Nara National Museum that currently runs “Threads of Devotion” exhibiting embroidered and woven Buddha images.  The title of the lecture was “Technical vicissitude of embroidery and gold threads from Asuka period (7th century) to Nara period (8th century)”.

According to Ms. Sawada, both the drape in Fujinoki ancient tomb and Tenjukoku Embroidary (both from Asuka period) are embroidered with hard-twist yarns whereas a number of embroidery works kept in Shosoin Treasure Warehouse are done with non-twist yarns.  The embroidery techniques are different; only back-stitch for Asuka period; Long-and-short stitch, satin stitch, chain stitch, French-knot stitch, and others for Nara period.  Especially long-and-short stitches are effectively used to express beautiful gradation. 

Ms. Sawada explained that the silk yarns in Asuka period were not in good quality and not strong enough to be used for embroidery.  Therefore, they had to twist hard.  Later in Nara period, good quality silk yarn was produced.  They were embroidered using long-and-short stitch and satin stitch to emphasize their beautiful luster.  Perhaps this technical innovation in silk production was enabled through the documents and/or specialists brought over to Japan from China. However this idea cannot be attested due to the absence of embroidery of the corresponding period in China, said Ms. Sawada.

Another interesting topic was about gold thread.  The gold threads in Asuka period and Nara period have clear difference.  Bansuishoku in Horyuji are braided with threads including gold and silver threads.  We can see metallic coiled thin ribbons in enlarged photos.  The metallic ribbons coiled around silk base thread, but the base thread cannot be found in the photo. In Nara period, gold was more thinly rolled thanks to advanced technology, and made into gold foil with Japanese paper pasted up in the back side.  The Nara period gold thread was made by thinly cutting the gold foil.  The gold thread in Nara period looks soft and easy to handle.  Because it is thin, you can make more gold threads from the same amount of gold.    

The gold thread in Asuka period has sharp edges, and looks like it easily damages the base thread and other embroidery yarns.  When you braid with this kind of gold yarn, other yarns have to be very strong and hard-twist!

Ms. Sawada talked about embroidery, but I was listening to her story always with Kumihimo in mind.  

The exhibition of “Threads of Devotion” was organized to commemorate the completion of the repair work of the Taima Mandala Tapestry (approx. 4m x 4m), collecting 130 woven and embroidered images of Buddhist figures and Pure Land scenes, including the National Treasure of Embroidered Shakyamuni Preaching (Nara period). 

To my joy, some Bansuishoku were among them.  One was from Hakutsuru Museum, and another from Fujita Museum.  There was a piece of Bansuishoku with 4 rows of Karakumi from a private collection.  That was new to me.  The color combination and the number of elements were the same as other Bansuishoku.  The original Bansuishoku must have been gorgeous!  Was it braided by 4 braiders or 8?

Be it embroidery or textile, in the 8th century in Nara a craftsman group with highly advanced technology capable of finishing such large-scale works in about a year was already organized. It really was a fabulous era like blooming flowers as an old poem goes.  With my present poor Kumihimo technique, I may not be hired as a Kumihimo craftsman.

2018年8月6日月曜日

四連角組 Quadruple Kakugumi


奈良国立博物館で開催された「春日大社の秘宝展」で、「赤糸威大鎧」を見て、その繰締緒が亀甲模様だったので、次の挑戦はこれと決めました。しかし、木下先生の「古代組紐技法」で調べてみると、1人が18本のクテを持ち、4人横に並んで組むという大掛かりなものでした。これには恐れをなして、もう少し少ないクテでできる四連角組に方向変換しました。クテは28本です。西大寺蔵の釈迦如来像体内納入経巻錦袋の紐のパターンだそうです。

二連角組AADDを2つ合わせたもので、だから四連角組と呼びます。木下先生の本では、2人で組むように想定されています。AADDをしてから2人で内側の糸を交換するのかと思ったのですが、そうではなく、1回目(外側)のAが終わった時点で、次のA(内側:パートナーに近い方)をする前に交換し、パートナーからもらったクテで次のAを組みます。次に外側のDを組んでからまた、次の内側のDを組む前に交換し、パートナーからもらったクテでDを組みます。

これを1人で組むには多少のアレンジが必要です。できるだけクテを持ち替える回数を少なくするように工夫しました。10ステップで1サイクルです。

いつものように、何回か失敗した後、何とかお見せできるようなものができました。

しっかり角ばっています。かなり苦労しましたが、こんなに美しいパターンが自分の手でできるのは、感動です。AADDでできるパターンを2つ組み合わせれば、いろいろと楽しい模様ができそうです。


At Nara National Museum, I saw the exhibition of “Treasures of Kasuga Shrine” and was especially attracted by a Kikko pattern braid which was used as a belt of a Japanese armor.  Instantly I decided that my next challenge would be Kikko pattern.  However, according to “Study of Archaic Braiding Techniques in Japan” by Kinoshita-sensei, the pattern needs 4 braiders, each holding 18 Kute.  It is too challenging for me.  I turned around and chose a Quadruple-Kakugumi with 28 Kute.  The pattern is from a bag braid for sutras hidden inside a statue of Buddha in Saidaiji temple in Nara.

The pattern is basically double AADD, therefore called Quadruple-Kakugumi.  Kinoshita-sensei explains in her book that the braid be made by two braiders.  I visualized two braiders exchanging the innermost (closest to the partner) Kute after doing AA and DD.  I was wrong.  You do A with your outer hand and exchange the innermost Kute with your partner and do A with that Kute you just received.  Then you do D with your outer hand and exchange the innermost Kute with your partner and do D with that Kute you just received. 

In order to do this process alone, you need to arrange the steps.  I came up with 10 steps for 1 cycle. 

As always, after making many mistakes, I finally braided something good enough to be photographed.  Very square!  Though I struggled, it is amazing that I can make such a beautiful pattern with my own hands.  With other color arrangements many other patterns are possible!

2018年7月7日土曜日

真田紐にビーズ Sanadahimo with beads


真田紐のベルトです。両端の経糸にビーズを通して組みました。結ぶ部分は角組で、ここにもビーズを組み込んでいます。ビーズは紐を豪華に見せてくれる上に、思いがけない効用がありました。紐が汚れるのを防いでくれるのです。次は、素敵なバックルを見つけたいと思っています。

使用材料: コットンキング、TOHO丸大ビーズ

These are Sanadahimo belts.  I put beads through both of the outermost warps and braided.  The both ends are Kakugumi and I used beads here as well.  I love beads!  They make my braids not only look gorgeous but also dirt-proof!  Next time, I would like to find a nice buckle.

Materials:  Cotton King, TOHO Marudai beads

2018年6月21日木曜日

幡垂飾でベルト Bansuishoku belt


夏のワンピース用に、幡垂飾のベルトが欲しいとずっと思っていましたが、夏も間近に迫り、取り掛かることにしました。ベルト部分は70cm、両端の結ぶ部分は25cmずつで、計120cmが必要です。糸を組むとその長さは約70%になるので、必要な糸の長さは170cmです。今回は、Ingrid Crickmore のブログ長いブレイドのまねをしてみることにしました。


約3分の1のところから組み初め、あとで長さを調整するために、結ぶ部分は組まずにクテを付けたままにしておきました。次に紐をひっくり返して、3分の1の長さでクテを付け、イングリッドがキャタピラと呼ぶ鎖編みを作りました。この部分が組む時に邪魔になるのではと心配したのですが、意外と問題なく進めました。ただし、糸が短くなってくるとやはり手元が混乱したので、予定の3分の2より10cm短い時点でキャタピラをほどきました。その結果、最後の3分の1はクテを含めて80cmになってしまいましたが、何とか組めました。


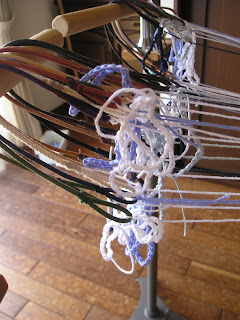
いつもはクテを糸の端に取り付けるので、今回のように糸の途中で同じ長さの位置に取り付けるのは大変でした。でも、ここですべての糸の長さを揃えておかないと、仕上がりに影響しますから、何回か付け替えて、長さを揃えました。これにかなりの時間がかかり、糸がもつれたりしました。この時に思い出したのが、一昨年のシアトルでのワークショップでイングリッドにもらった櫛とゴムバンドでした。この櫛とゴムバンドを織機の筬のように使って、糸が絡まないようにしました。写真左で櫛が立つように支えているのは、マレーシアでお土産にもらったポストカードスタンドです。  


両端の結ぶ部分は、2本の角組にして、ビーズを付けました。ビーズの重みで、結んだ組紐がすとんと落ちてくれます。


今回は長さの記録を更新して120cmを達成しましたが、糸の扱いにかなり苦労しました。

初期配色:
〇〇◍◍〇〇◎◎● ●◎◎〇〇◍◍〇〇


I have been wanting a Bansuishoku belt for a summer dress.  With the summer just around the corner, I set about to work.  I need 70cm for a belt and 25cm each for the ends to be tied, in total 120cm.  Since threads become 70% long when braided, I need 170cm long threads.  I watched the latest blog of Ingrid Crickmore where she explains how to make longer braids and decided to follow her instructions.


I started at one third of the length and kept Kute at the end so that I can adjust the length later.  Then I turned around the braid and attached kute at the point of one third of the length, and made what Ingrid calls Catapilar.  I was afraid that these catapilars might disturb braiding, but I had no problem!  However, near the end, when the threads became shorter, catapilars started bite each other and I had to undo the catapilars 10 shorter than I had planned.  As a result, the last one third was 80cm including kute, which I somehow managed to braid.  


Usually, I attach kute at the end of a thread.  It was not easy to attach kute in the middle of a thread at the same length.  It is very important to make all the threads the same length in order to have a good finish.  Therefore, I had to redo attaching several times, which took me a lot of time.  To avoid threads to be entangled, I used the comb and the rubber band which Ingrid gave us at the workshop in Seattle two years ago.  Using them as a reed of a loom, I managed to arrange threads.  The grey thing at the left of the photo supporting the comb is a postcard stand I got in Malaysia.  


I used beads for the both ends of the belt so that their weight makes the tied ends straight down. 
I have renewed my record of braid length 120cm, but I had a hard time dealing with the threads.

Initial color arrangement:
〇〇◍◍〇〇◎◎● ●◎◎〇〇◍◍〇〇

2018年6月1日金曜日

平組の一間組、二間組、三間組比較 Comparison of Ikkengumi, Nikengumi and Sankengumi

前の前の記事で、「越すループ数が多いほど、紐の幅は狭くなり、厚みが増します」と書きましたが、やはり実際に見て頂いた方がいいと思い、3つのサンプルを作りました。いずれも単色ループ3色で13ループを使用しています。初期の配色は次の通りです。

           ●●●〇〇〇  ◎◎◎◎◎◎◎


上から、一間組、二間組、三間組です。幅はそれぞれ27mm、22mm、18mmとなりました。残念ながら、厚みを測る道具を持っていないので、正確には測れませんが、ほぼ1.5mm、2mm、3mmです。下に行くほど、模様が圧縮されています。作業としては、越えるループ数が多いほど、速く組めます。

それと、前の記事で、「幅中央に、クテ打ちで平組をしたときに出る縦の筋」と書きましたが、それは、一番上の一間組で最も顕著に見られます。これは、ループ数が奇数なので、左から右へと組んで行ったときに、最後に操作ループを半回転しますが、そのループの片方の要素(糸)だけが、2要素を越えることからできます。ですから、この組紐は正確には、左右対称ではありません。

同様に、二間組、三間組でも非対称性が起こりますが、写真では判りづらくなっています。実物も見えにくいです。それはおそらく、一間組では、半回転した操作ループの1要素が2要素(2倍)を越えるのに対し、二間組では3要素(1.5倍)、三間組では4要素(1.3倍)を越えるので、次第に目立たなくなるからだと思われます。

I wrote in the previous article that the more loops the operating loop goes over and under, the narrower and thicker the braid becomes.  I made three samples to show it.  I used, for all the three braids, 13 single-color loops in 3 colors and the initial color arrangement is as follow:
   ●●●〇〇〇  ◎◎◎◎◎◎◎

From the top to the bottom, they are Ikkengumi, Nikengumi and Sangengumi.  The width are 27mm, and 22mm, and 18mm respectively.  Unfortunately I do not possess a tool to measure the thickness.  The thickness of the three braids are very approximately 1.5mm, 2mm, 3mm.  The patterns get compressed as the operating loop goes over and under more loops.  As for manipulation, the more loops you go over and under, the quicker you can braid.

In the earlier article, I also wrote, “a vertical line which is typically seen in Kuteuchi braids”.  That line can be seen the most clearly in the top braid, Ikkengumi.  This line is produced when you half-turn the operating loop after going from left to right over and under the loops.  When you half-turn the operating loop, one of the two elements (threads) of the loop goes over 2 elements.  Therefore, exactly speaking, the braid is not bilaterally symmetric.

Likewise, asymmetric nature happens with Nikengumi and Sankengumi, but in the photo we cannot see it clearly. Even in the real ones in my hand, the lines are less conspicuous than in the Ikkengumi.  I thought about the reason and came to the following idea.  When you half-turn the operating loop, with Ikkengumi, one element of the operating loop goes over 2 elements (200% of usual), while with Nikengumi it goes over 3 elements (150%) and with Sankengumi 4 elements(133%).  This decrease of % causes less conspicuity.

2018年5月21日月曜日

白鶴美術館で幡垂飾を拝見  Visited Hakutsuru Fine Art Museum to see Bansuishoku


白鶴美術館 (Wikipediaより)
Hakutsuru Fine Art Museum (from Wikipedia)

さわやかな5月になりました。神戸御影にある白鶴美術館が所蔵する法隆寺の幡垂飾が展示されると聞き、クテ打ちのグループ3人で出かけました。東京博物館にある法隆寺献納物の幡垂飾とよく似ています。お目当ての幡垂飾には、「几帳飾」という題がついていました。

第一印象は、組紐より金銅の鈴金具が立派で目立っている、という感じでした。写真で見るよりは糸が細く、全体に緩んでほどけそうでした。鈴金具は組紐の幅の両端と真ん中に留め具で固定してあるものもありました。これだけぶら下げられると、痛むのも早いだろうなと思いました。

几帳飾りの隣に展示してあったのは、神護寺伝来の平安時代に作られた経帙でした。10巻のお経をまとめておく、すだれのようなもので、平組の組紐がついています。とても細い糸をぼかし染めにした糸が使われているようでした。紐の幅中央に、クテ打ちで平組をしたときに出る縦の筋がはっきり見えました。奈良博物館にも神護寺の経帙がありますので、こちらを参考にしてください。

幡垂飾を組んでいて、いつも本物を見てみたいと思っていたのが実現してうれしかったです。しかし、年月とともに、美しかったものも色あせ、ほどけ、退化していくという現実も見ました。物はいつかは失われるからこそ、それを作る技術はしっかり伝えていかなければならないということを、実感した次第です。

One pleasant day in May, together with my Kuteuchi group friends, I went to Hakutsuru Fine Art Museum to see Bansuishoku that originally belonged to Horyuji temple.  Their Bansuishoku is similar to the one that is currently kept in Tokyo National Museum.  At Hakutsuru Fine Art Museum it was exhibited under the title of “decoration for a portable multi-paneled silk partition

My first impression was that the gilt bronze bells are more dominant than the kumihimo.  The threads are thinner than those we see in photos.  As a whole, braiding is loose and almost ready to fall apart.  Bells are attached on both sides of the braid, and some are attached in the middle of the braid.  With so many metal bells hanging, the braid would wear out quickly, I thought.

Next to the partition decoration, there was “Kyochitsu”, a sutra wrapper made with fine bamboo splits twined with silk threads.  The wrapper was made in Heian period (794 to 1185) and used to belong to Jingoji temple in Kyoto.  Ten sutra scrolls were wrapped with this wrapper and a Hiragumi braid is attached to tie around the wrapper.  The threads looked very fine and ombre dyed.  In the middle of the braid, I could see clearly a vertical line which is typically seen in Kuteuchi braids.  Nara National Museum also has the wrapper from Jingoji temple.

While braiding Bansuishoku, I always wanted to see the original ones.  I am very happy that my dream has come true.  But, at the same time I learned the fact that as time goes by, even beautiful treasures lose their vivid colors, get loose and deteriorate.  Things do not last forever, they are to be lost some day.  That is why the techniques to make these beautiful things have to be handed down through generations.

2018年5月16日水曜日

平組または一間組 Hiragumi or Ikkengumi


一間組は、操作ループが他のループを1本ずつ上下に越して組む方法ですが、これを2ループずつ越すと二間組になり、3ループずつ越すと三間組になります。越すループ数が多いほど、紐の幅は狭くなり、厚みが増します。だから、必要な厚みと幅に合わせて越すループ数を変えることで、希望通りの紐ができあがります。初期設定の配色の仕方で、さまざまなパターンを楽しむことができます。

3パターンとも単色ループ11本で、初期設定は次の通りです。
   〇〇〇◎◎◎◍◍◍◍◍

組み方は、ビデオをご覧ください。


写真の上から2番目の紐では、白と黄色の糸は、両端に留まり、中央まで移動していません。また、緑は中央に留まったままです。このやり方を次のビデオでご覧下さい。


写真の一番下の紐は、上の2つの方法を交互に繰り返しました。このように糸の移動を上手く制御することで、パターンの可能性がさらに広がります。


Ikkengumi means that an operating loop goes over and under other loops one by one.  When the operating loop goes over 2 loops and under 2 loops, it is called Nikengumi.  If it is over 3 and 3, it is Sankengumi.*  The more loops the operating loop goes over and under, the narrower and thicker the braid becomes.  That means, by changing the number of loops to go over and under, we can make a braid of exact width and thickness we want.  By changing the color arrangements, we can enjoy various patterns.
    
       * 1=ichi,  2=ni,  3=san  

I used 11 single color loops and the initial color arrangement is as follow:
   〇〇〇◎◎◎◍◍◍◍◍

Please see the video to know more about how to braid Ikkengumi. 


In the second top braid in the photo, the white and yellow threads stay on both sides while the green ones remain in the center.  I will show you how to do this in the next video.


The bottom braid in the photo is made by alternating the two patterns. By controlling the movements of thread using this technique, we can have even more variations of patterns.

2018年4月20日金曜日

縄連組、山形文、矢羽文、二条軸一間組、ささなみ組 Joren-gumi, chevron, sasanami


いろいろの名前がついていますが、木下雅子先生は、「2方向斜行縄連組織平一枚組紐」、あるいは略して「2方向斜行縄連組織組紐」と呼んでおられます。私はさらに略して、「縄連組」と呼ばせていただきます。

法隆寺献納宝物のにも付いていて、その幡の様式から7世紀後半から8世紀前半に作られた、と特定できるそうです(「日本の美術1 No.308 組紐」)。正倉院にもあります。聖徳太子が剣を吊るしておられる帯も、この組み方だと思われます。

ループを半回転させ、その中に別のループが通ります。しっかりとしたものができます。剣を吊っても大丈夫ですから、バッグの持ち手に最適です。

組み方をビデオで説明します。


ビデオでは、一番外側のループを中央に持ってきてから、全てのループを中央に向けて半回転させていました。反対に、中央のループを外側に持ってきてから、全てのループを中央に向けて半回転させると、矢羽の向きが反対になります。これを組み合わせると、唐組 (または幡垂飾)になります。

写真の一番上のものは、山が2つできました。2人で組んで、内側のループを交換します。これを私は、休め台を使って1人で組みました。2,3年前に組んだもので、組み目も乱れていますし、左半分で、黄色と緑の糸を取り違えている部分が見えます。この頃はまだ、「解いてやり直す」ということをしていませんでした。


These braids have many names.  Masako Kinosita calles it 「2方向斜行縄連組織平一枚組紐」 or 「2方向斜行縄連組織組紐」 for short.  I make it much shorter and call it Joren-gumi.
Joren-gumi can be found attached to a Ban from Horyuji Dedication Treasure and can be identified as being made between mid 7th century and mid 8th century (「日本の美術 (Art in Japan) 1 No.308 組紐 (Kumihimo)」.  It is also included in treasures from Shosoin.  The belt Prince Shotoku is wearing in his famous portrait to suspend the sword is perhaps Joren-gumi.

You half-turn all the loops and a loop goes through them.  The braid is so sturdy that you can hang a sword.  Ideal for handles of a bag.

I show you how to braid Joren-gumi in the video.

In the video, I bring the outmost loops to the center and I half-turn all the loops inward.  If you bring the center loops to outmost and half-turn all the loops inward, you can get chevrons up-side-down.  By combining the two techniques, you can make Bansuishoku or Karakumi.

The top wide braid has two ridges.  Duet braiders exchange the inner loops.  I did it solo using the Kute Rest Stand.  I braided this one a few years ago, and you can see a mistake in the left part involving a yellow and green threads.  At that time, I did not know to “undo and redo” yet.

2018年4月7日土曜日

80ループ幡垂飾 80-loop Bansuishoku


今の私にとって、幡垂飾の長さの限界は105cmです。次は幅の限界を知ろうと、80ループに挑みました。

今回の糸の長さはやりやすい65cm、使用した糸は、昨年56ループの幡垂飾を作った時の残りのハマナカのアプリコと、コットンクイーンの水色、赤3本取りです。ループの数が多いので、糸が絡まないよう、下準備は慎重に、特に足糸を取り付ける作業は、やり直しをしなくて済むように心がけました。 


組み始めてみると、作業はそれほど大変ではありませんが、数段前に間違いを発見したりすると、解くのが大掛かりでした。糸は左右にダイナミックに動くので、間違えたところだけを解きたいのに、かなり遠い所まで戻ってやり直さなければなりませんでした。おかげで、糸の動きがよく分かりました。いつも思うのですが、組み方をよく知るには、解き方ややり直し方も熟知しなければなりません。順調に進むのは誰でもできますが、間違えた時に対処して、目立たないように素早く修復するには、熟練が必要です。勉強になります。 


アップで見ていただくと、萌黄色の糸がXに交差するときに、緩んでいるのが分かります。これが私の課題です。きつく締めているのですが、2,3段組むと緩んできます。これを解消するいいアイデアがあれば、教えていただきたいです。


The longest Bansuishoku I can braid currently is 105cm.  I want to know my limit of width.  So I challenged 80 loops. 

I used the left-over of Hamanaka Aprico from last April that I made 56-loop Bansuishoku with, and Cotton Queen light blue and red.  Since I was dealing with so many loops, I tried to be very careful.  Especially I decided to “do it right the first time” when I attached threads to foot-threads. 


Once I started braiding, the work itself was not so different from 56-loop.  Only when I found a mistake a few rows earlier, undoing job was much heavier than 56-loop.  Threads move so dynamically to right and to left, that I had to undo the parts far-away from my mistaken part.  That was a good lesson.  I could understand how threads move, dive and reappear.  As always, you have to be able to undo mistakes in order to fully understand braiding.  Anyone can braid, but you need experience and knowledge to find and correct your mistakes.  It is a good lesson of life. 


If you look at the photo closely, you will notice that the light green thread is loose when it makes X cross.  That is my problem.  I tighten it very hard, but after a few rows, it becomes loose.  I would appreciate it if anyone could tell me how to solve this.

2018年3月14日水曜日

奈良国立博物館公開講座「官人の腰帯」 Open Lecture “Waist Belts of Ancient Government Officials“ at Nara National Museum


「腰帯」という言葉に引かれて、公開講座へ行って来ました。大阪歴史博物館で見たこの光景では、官人が組紐の腰帯をしていました。もしかして組紐の話かなと思ったのですが、残念ながら、主に革のベルトに、金属や石を取り付けた帯の話でした。でもお話自体は面白かったですよ。

難波宮の時代や持統天皇の時代には、官人も綺帯(組紐の帯)をしていたが、『扶桑略記』には、慶雲4年(707年)には「天下始用革帯」という表現があり、この頃から、官人は革に金属片をつけた腰帯をするようになったそうです。革の部分はほとんど残っていませんが、金属片や、後の平安時代に用いられた石の片はよく出土するそうです。資料として、養老律令(757年)の第19条衣服令全14条の中から、礼服(らいぶく)の帯として、皇太子は白い帯、親王、諸王、諸臣は絛(くみ)の帯(組糸の帯)を着用すること、朝服として上位の役人は金銀で装飾した腰帯、下位の役人は烏油(おそらく黒漆)腰帯を着用するように、という部分をコピーしていただきました。組紐は位の高い人が身に付けるものだったのです。

正倉院には、聖武天皇が着用されたであろう御帯が残っています。もぐらの革にサイの角で作った飾りをつけたものと、夜光貝で作った飾りのついたものです。

養老律令に服装のことが書いてあるなら、日本書紀にも何かあるかな、と検索してみると、ありました。持統4年(648年)4月の条の朝服に関するところで、「上下通用綺帯・白袴」。すなわち、身分の上下を通じて、綺帯(カムハタノオビ=組紐の帯)と白袴を用いなさいということだそうです。この頃は官人も綺帯をしていたのですね。それが、60年後には、革の帯になったのは、革の方が強いという実用の面からか、絹が貴重になってきたのか、私にはわかりません。ちなみに、平安時代に銅などの金属片から石片に変わっていったのは、銅を貨幣に使うために必要になったからだそうです。

予想とは少し外れた講座でしたが、組紐が礼服として養老律令や日本書紀に記載されていることが分かりました。しかも新しい漢字、「綺帯」と「絛」を覚えました。

Attracted by the word “Waist Belts” I went to attend the Open Lecture “Waist Belts of Ancient Government Officials“ held at Nara National Museum.  Since I remember seeing this (photo) at Osaka History Museum and the government officials were wearing Kumihimo belts, I expected to listen about Kumihimo, but the fact was that it was about belts, mainly made of leather, with metal or stone ornaments.  The lecture itself was interesting.

During the period of Naniwa (present Osaka) Palace (mid-7th century) and the reign of Jito Regnant Empress (late 7th century), government officials wore Kumihimo belts, but according to an old history book called “Fuso Ryakki”, around 707 government officials started wearing leather belts with metal ornaments.  The leather parts are usually decayed, but many metal and stone ornaments (used later during the Heian Period) have been excavated.  We were given a copy of extracts from Yoro Code (757) the 19th article Dress Code.  It says for formal dress on special occasions, Heir to the Throne should wear a white belt, Princes, Lords and high-ranking officials should wear Kumihimo belts.  As a service dress, mid-ranking officials should wear a belt with gold and silver color ornaments, and low-ranking officials should wear a leather belt coated with black Japanese lacquer.  So, Kumihimo was allowed only to noble people!

At the treasure house of Shoso-In, belts which Emperor Shomu must have used are preserved.  One is a belt made with mole leather with ornaments made with rhinoceros hornsThe other one is ornamented with night-glow shell fish.

If Yoro Code mentions anything about Dress Code, there must be something written about dress code in “The Chronicles of Japan”, I thought.  Then I googled and found.  In the article of April 648, it touched on court dress code.  It said, “regardless of their ranking, everyone should wear a Kumihimo belt and white Hakama (formal men’s divided skirt) at the court”.  So at the mid- 7th century, government officials used wear Kumihimo belts too.  Some 60 years later, they started wearing leather belts.  Was that because leather is stronger and durable, or because silk was valuable?  I do not know.  By the way, the reason why metal ornaments were replaced by stone ornaments in Heian Period was that copper and other metals were needed to mint coins.

The lecture was a little out of my focus, but I learned that Kumihimo is mentioned in Yoro Code and the Chronicles of Japan.  Plus, I learned two new Chinese characters 「綺帯」 and 「絛」 meaning Kumihimo!

2018年2月28日水曜日

1メートルの幡垂飾でショルダーバッグ 1 meter Bansuishoku for a shoulder bag

長い幡垂飾に挑戦しようと、140cmの糸を用意しました。半分の70cmにクテと足糸をつけると、92cm。 近視の私には、92cm先の組み目がよく見えません。何度か失敗して、なんとか数段組みました。編み物もそうですが、最初が難しいですね。あとは割合上手く進みました。最後まで組んで、反対側を始めるのも苦労でした。糸をピンと張らないと正しく組まれているのか解らないが、ピンと張るには遠くから引っ張らなければならず、そこからは組み目がよく見えない、という状況です。片手で糸を遠くへひっぱりつつ、組み目を覗き込む、それを左右繰り返す、という動作が続きます。手足のよい体操になりました。

20ループで組んで、仕上がりは長さ105cm、幅22mmになりました。コットンキングを使用しました。 


できあがった紐を、ショルダーバッグにつけました。昨年のNHK「すてきにハンドメイド」のテキストにあった型紙を使って、裂き織と、ヤフオクで買った帯地をあわせ仕立てました。テキストでは口が開かないようにスナップをつけていましたが、私は紐を垂らすようにしてみました。こちらは10ループのAADDです。 


幡垂飾は、どんな配色にしても格調高くて素敵です。


For my next challenge to braid a long Bansuishoku, I prepared 140cm-long Cotton King threads.  Folded in half, added Kute and Foot Thread, the total length is 92cm.  With my short-sighted eyes, I could not see the braided parts clearly.  After some failures, I managed to braid several rows.  Like knitting, the starting part is the most difficult.  The rest went well.  When I finished the first half, I turned the braid upside down and started the other half.  Again, it was not easy.  You have to keep the threads tight to check the braided parts, but to tighten the thread you have to be away from the braided parts, and you cannot see very well.  While pulling away the threads with one hand, I checked the braided part closely, and do the same on the other side.  I repeated these movements.  It was a good hand and feet exercise. 


I used 20 loops.  The finished braid was 105cm long and 22mm wide. 


I attached the finished Bansuishoku to a shoulder bag which I made using a pattern I found in a textbook of NHK “Sutekini Handmade” from last year.  The material is Sakiori I made some years ago and Obi (kimono sash) material.  Instead of a snap fastener at the top of inside, I used another braid, 10-loop AADD.


Bansuishoku is always elegant and beautiful with any color combinations.


2018年2月17日土曜日

改良した道具で久しぶりの幡垂飾 Bansuishoku again using improved tools


懸案の道具の改良をしました。クテの数が多くなると、手で持ちきれなくなります。そこで、作業しないクテを休めておく台があればということで、1年半ほど前に、ホームセンターで探し回って、ようやく見つけたのが、タオル掛けです。これに合う丸い木の棒を買って来て、かまぼこ板に取り付けました。それをスタンドに取り付けたいのですが、何かないかと、父の作業小屋をあさってみると、父が夜も盆栽の手入れができるようにと使っていた電気スタンドの台がありました。これにかまぼこ板をクランプで取り付ければ、完璧です。 


スタンドのホコリや汚れをきれいにしていて気づいたのですが、これを他でも見たことがあるのです。ようやく思い出したのが、洋裁用のボディです。ボディの部分を取り外すと、まるで双子のように同じ形をしていました。

昨年はこの2つのクテ休め台を使って、幡垂飾を組みました。問題は、スタンドの円盤にクランプで取り付けている部分が小さいため、時々外れてしまうことでした。それで、今回、新しいかまぼこ板に丸い穴を開けて、スタンドのポールを通すことで、しっかりと安定させることにしました。丸い穴を開けるのが大変でしたが、いくつか失敗して、なんとかでき上がりました。


できあがった物を眺めて、また思い出したのが、カメラの三脚です。昔買った簡単な三脚を出してみると、うまい具合に、クテを掛けてくださいと言わんばかりに、ハンドルが付いています。ハンドルの手元が太くて、その先が細くなっているのが難点ですが、持ち運びも簡単だから、仲間と作業をするときに持っていけます。こうして眺めてみると、役に立つ道具が身近にあるものだなと、感心しました。


改良した道具を使ってさっそく、幡垂飾のサンプルを作りました。しっかりした組み方なので、バッグの持ち手や、夏のワンピースのベルトにいいかなと思います。


Finally I managed to improve my Kute Rest Stand.  When you have too many Kute to hold in your hands, you may want to deposit some of them somewhere.  About one and a half years ago, I visited a home center and looked for a suitable tool until I found a pair of towel hanger parts.  With a matching wooden rod, and a plate of Kamaboko*, I made a Kute Rest. 
What I needed next was a stand.  I looked around in my late father’s shed, and found a lamp stand which he used when he trimmed Bonsai in the evening.  I attached my Kute Rest to this stand with a cramp. 

* Kamaboko is a steamed fish paste which is often attached to a wooden plate.


While I was cleaning the old stand, I noticed that I had seen something like this before.  I finally remembered.  It was a body I use for dressmaking.  After removing the body part, I found almost the same stand as the one I already found.  They were almost twins. 

Using these Kute Rest Stands, I braided Bansuishoku last Aril.  The problem was that the connecting parts were too small that sometimes the Rest fell off.  I decided to make a hole in the wooden plate through which the stand pole can go so that the plate becomes stable.  Making a hole was not an easy task for me.  After sacrificing several Kamaboko plates, I finally made two plates with a more-or-less round hole.


I was admiring my finished work when I recalled a tripod for a camera.  I dug out my old tripod.  It has a nice handle as if it is inviting Kute to be suspended.  Ideally the handle should be of the same thickness, but never mind.  It is foldable and easy to carry.  I can take it in my bag when my team gets together to work.  Looking around, I realized anew that I am surrounded by very useful tools once I look for it.


As a trial of the newly improved tool, I made samples of Bansuishoku.  It is a sturdy and beautiful pattern, good for bag handles and a belt for a summer dress.