It's been a while since my last update. This is the three-color Kikko braid I demonstrated at the workshop of the Kumihimo Society on December 13th. It's a unique setting with eight kute in the left hand and five in the right (8-5). The braiding method is AADC (top photo). It's featured in Shikasuyo's "Hiden Itogumi" (Secret Method of Thread Braids) and is also introduced on page 23 of Kinoshita Masako-sensei's "Study of Archaic Braiding Techniques in Japan"
The photo below shows a three-color 22-strand Kikko braid (5-6-6-5) that I learned at Jacqui Carey's workshop in Cleveland in June of this year. Using this technique, I braided a dog’s collar with two strands of Hamanaka Aprico. The black fur really brought out the braid.
I felt like challenging a big task, and I chose this pattern. Three braiders line up side by side, holding 22 kutes, 11 in each hand. That means I have to manipulate 66 kutes all alone. It surely is a big task!
I prepared 11 different color kutes, and 6 different color foot-threads. This preparation alone took one day. I used 3 kute-rest-stands.
The stands I used this time were T-shaped stands, which were memento of a deceased kumihimo teacher. I received them through Tada-sensei. The horizontal bar of the T was too short to rest the 11 kutes, so I fixed a ruler on the top.
The initial color arrangements are the same for all three braiders.
●〇●〇●〇●〇●〇● ●〇●〇●〇●〇●〇●
The braiding technique is AADD. There are 11 kutes, so if you braid them normally, you can naturally get a jagged pattern with 5 and 6 rows. When you want a solid color part, you do a little secret manipulation (ref. “Study of archaic braiding techniques in Japan” p. 134) so that the color doesn’t change.
The upper one in the photo is made with 2-thread Cotton Queen and the lower one with Hamanaka Aprico. Both are shiny and beautiful threads. You can also have chevron patterns on the side. The solid color part is a little narrower due to the secret manipulation. It is a sturdy braid that is about half as thick as it is wide.
BBCC is not as angular as Kakugumi, and its cross section is close to a circle. I covered BBCC a long time ago, but only introduced two types. This time, I made a lot of fun things with different color combinations and using bi-color loops. It is also interesting that the pattern sometimes appears above and below the cord, and other times appears on the left and right sides
Below I show you color patterns from the top to the bottom.
1.Pink and brown
〇●〇●〇● ●〇●〇●〇 or 〇〇〇〇〇〇 〇〇〇〇〇〇
●〇●〇●〇 〇●〇●〇● ●●●●●● ●●●●●●
Both are the same. This is what I covered before.
2.Chevron half green and half red on white background
〇●〇●〇● 〇〇〇〇●〇
〇●〇●〇● 〇〇〇〇●〇
This is very nice!
3. Pink and white chevrons alternate on a grey background
●〇●〇〇〇 〇〇〇●〇●
●〇●〇〇〇 〇〇〇●〇●
4. Three shades of pink chevron on a brown background
〇●〇●〇● 〇〇〇〇〇〇
5. Vermillion and yellow Vs on a dark blue background
●●●●●● ●●●●●●
6. Lavender and purple strips with an accent in the middle
To prepare for the workshop of Itsukushima-gumi, I read the book "National Treasure Heike Nokyo (Heike clan’s sutra dedication)" written by Shigemi Komatsu. It is written that Taira (Heike) no Kiyomori (who had overwhelming power in Japan in the 12th century) ordered 32 male members of the Heike clan to dedicate one volume each of the Lotus Sutra and other works to Itsukushima Shrine. With the name of the clan at stake, they must have competed to make gorgeous scrolls by commissioning the best craftsmen, calligraphers, and painters, using luxurious materials such as precious paper, gold leaf, and gold powder, without worrying about money. All of the completed decorative sutras are splendid with elaborate designs. The size and style of painting are different, but interestingly, the winding cords are unified.
Questions were asked at the end of the workshop. “Was the Itsukushima-gumi created for the Heike Nokyo, or did it exist before that?'' Now, I don't know. However, I thought if I had been the Kumihimo master in charge, and if I had seen the efforts of other masters, I would have come up with a new design instead of the existing Kumihimo style. I myself was surprised by this answer. It certainly is my idea about it, but I didn't realize it until the question was asked. Thanks to the questioner.
The bottom of the photo shows Saidai temple Daijingu Goseitai Zushichō, which is very similar to Itsukushima-gumi. This is shown in the photo 29 of Professor Masako Kinoshita's "Study of Archaic Braiding Techniques in Japan", not the one hanging vertically, but the one sewn horizontally.
For the workshop, I made 2 video footages showing how to braid Itsukushima-gumi with Kute.
When I was asked by the Kumihimo Society in Japan to teach Kute braiding, I instantly decided to take up my favorite Itsukushima-gumi. However, the workshop is done through Zoom and it is only for an hour or so. Since it is too challenging to learn Itsukushima-gumi that way, I gave it up and decided to work on a 9-kute twill braid. The braid will be helpful to learn Itsukushima-gumi.
〇〇〇 ●●●●●●
〇〇〇 ●●●●●●
A Zoom workshop is convenient because you can be connected with members while you stay at home. You cannot, however, see the manipulation of Kute clearly. So I prepared a video footage. It has been a long time since I had used a video camera. I almost forgot everything.
I made many samples as you see. The top 3 are the same as the one I am braiding in the video, repeating 2 cycles. The fourth one is done using finger loop braiding technique. The finished braid is tighter than the Kute braids. The fifth is border pattern only. The bottom 2 are only one cycle, which is more loud and cheerful, compared with the top 3 which are more stretched and relaxed.
I made a blouse that features a kumihimo. I found the pattern of this blouse more than 30 years ago in a magazine and kept it for so long. I had been trying to find a nice string for this blouse but I could not. Now that I can braid, I can make whatever braid I want! The material is rather quiet olive green, and I used bright yellow green for the string. The yarn is Hamanaka’s Aprico. The beige and yellow yarns are lame yarns, giving the finished braid some gaiety.
The braid is 110cm long. I first braided a half of the length, then connected the next half as the photo shows. Aprico is thin and fine and takes long time to braid, so I did not braid the middle 40cm.
The finished braid’s width and thickness is exactly what I wanted. I never dreamed 30 years ago that I would be able to make such a beautiful braid with my own hands.
I had a luck to get a free Marudai. Since then I have been practicing various patterns referring to Makiko Tada sensei’s “Recipes for Beautiful Kumihimo and Small Kumihimo Accessories”. Currently, I can manipulate up to 16 tamas. I thought the movement to transfer up, down, left and right was easy for beginners. This is because the thread only moves horizontally and vertically. I love Hiragenji-gumi that is easy to manipulate and looks gorgeous.
I like to make things that I use in my daily life, so I braided a shoulder strap for a pochette. The thread I prepared first, thinking in the same way as the case of Kute-uchi, was too short. I finally learned that I need more than double length of the finished product. As I am a beginner, I use Cotton Queen, using 5 threads as 1. The initial color arrangement is as below.
The pochette is made of a Hakataori belt which I got through Yahoo Auction. It is beautiful, and my Hiragenji-gumi is also beautiful, I think.
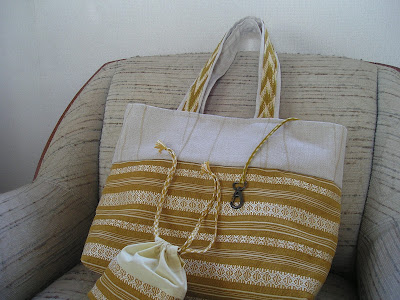
Long time no see. I made a bag using a yellow Hakataori kimono-sash for summer which I got through Yahoo Auction and curtain material. I made another bag with the same Hakataori sash before. This time, I matched it with different curtain material, which gave the bag brighter impression. The handles are Kute-uchi oblique lattice single-unit braiding, though the last time it was Sanada-gumi. The key-holder is Kakugumi (CC) and the braids for the drawstring bag is Shigeuchi (CD) with Hamanaka’s Aprico. Aprico is finer than Cotton King and the finished braids are more delicate. The beige thread is spun with gold lame giving the whole braid a gorgeous look.
The sneaker strings that I have been wearing for many years have finally broken. In fact, this pair is already the second generation. That means these shoes and I get along very well. The shoes themselves are very old, but I want them to last one more generation. So this time I made the strings with Kute.
I used 7 Kute and braided Shigeuchi (AB) with my favorite Cotton King. The strings have to be 90cm long. I started in the middle of the length to one end, and restarted from the middle to the other end.
I am pleased to find the finished strings much nicer than I had expected. Perhaps my old shoes are also happy. With a new pair of strings, I shall go out for a walk with light steps.
The pharmacy I usually go celebrated their third year in business and gave us an eco bag. I liked the color and size of the bag, so I use it every day. As it did not have a string to keep the bag folded, I braided a 8-loop Shigeuchi (or Koraigumi or AB) for 28cm. The material is Cotton Queen. The button hole part is AA.
Next time I go to the pharmacy, I have to show this to them.
Made two pochettes from obi sash material. The shoulder belts are 90 cm long Joren-gumi with 18 kute. I prepared 130 cm long Cotton King threads in order to make 90 cm belts. 130 cm is too long for kuteuchi, so I devided them into two as I did before following Ingrid Crickmore’s method. The photo shows the threads with Kute attached at the half length points, with the remaining length crocheted in chains and made into a circle. I was afraid that these chain circles might disturb braiding, but it proved no problem.
What bothered me was rather the knots of the threads which hold the foot-threads of Kute. These knots cannot be undone and can be seen in the finished work. I need to develop a knot that can hold foot-threads firmly and can be undone easily. My knots are almost unseen while in use, but still bothers me when I show them in the photos.
I made a Double Kakugumi (AADD)braid for a fastener. It is a joyful moment when I chose color arrangements and type of braiding. I was away from kumihimo for a while, but having a pair of my Kute Rest Stands with threads hanging on them makes me smile.
On the page 43 of “Exploring the Braids of the Andes” by Ms. Yoshie Aoyagi, which I introduced in my last post, there are instructions on how to braid a flat braid with free-end. I tried this braid. You tie 24 threads and fix the knot with a clip to a board. The other ends are loose, which was hard for me. I am used to pulling kute tight. Perhaps my tightening was not good enough, the finished braid has irregular stitches.
Then I tried braiding with kute. Like in the book, I prepared 24 threads, eg. 12 kute. You take the left-end kute (operating kute) and it goes over 2 kute and under 2 kute. In the end you have one kute left on the right hand. The operating kute goes over that last kute. Then you turn the operating kute once and place it to the right-end.
I found a good point about this method. Till now, I always used odd-numbered kute for Nikoshi flat braid. Nikoshi means over 2 threads. The braid has a stitch over 3 threads on one side of the center, which stands out. However, with even-numbered kute, you have a stitch over 1 thread on one side of the center and a one over 2 threads on the other side, which is less outstanding than a stitch over 3 threads.
On the page 43 in Ms. Aoyagi’s book, her teacher starts from left by going over one thread and then over 2 so that you have nice and regular stitches in the center. I was impressed to learn that with such a small care, you can have much better results.
The photo above shows from the top to the bottom 24 threads free-end, 12 kute and 13 kute.
A cool breeze blew in my face when I was idling and beaten by the extremely hot summer and the corona virus restrictions. Ms. Yoshie Aoyagi, whose workshop I attended last December, has published a kumihimo book (in Japanese only so far)! I ordered the book right away. In the book a number of braids she encountered in the Andes are presented one after another. She explains so much in detail where and from whom she learned each braid that I feel as if I were traveling with her from an Andes town to another. She also introduces various braids she made after she came back from the trips.
She learned many types of braids that are braided only with hands without using any tools. The braid I learned in the workshop last December was one of them. As I thought back then, it is fairly difficult to explain that way of braiding with words and figures. Ms. Aoyagi has learn directly from Andean experts and mastered them all. I admire her ability to understand new techniques. I am also impressed by her skill to interpret the Andean braiding to Japanese kumihimo using Takadai. That only can be done because she had been constantly improving her kumihimo skills for many years.
I hope I can visit the Amano Textile Museum in Peru someday.
In the book she referred to Mr. Rodrick Owen whose workshop in Seattle I attended in 2016. The book made me want to try that pattern I learned in Seattle once again. It is already September, and the weather should be cooler. I suddenly felt the power to tackle kumihimo anew. Thank you, Ms. Aoyagi. You made me wake up!
Braided a band for a summer hat. I did not plan it, but one day the crown cracked apart. I suppose the sewing machine was not in a good condition when the hat was sewn. The stitches came loose. I should not have bought it only because it was on sale last year. I had to remove the band in order to repair the hat. One by one I sew the stitches. It took me a while to finish all the stitches. Finally I was ready to put the original band back to the hat. Then I had an idea. Now that I spent so much time repairing the hat, why should not I spend more time and braid a new band. In fact, at the Braid 2019 workshop last October in Igaueno, I met a lady with a nice hat decorated with a braid she had braided herself.
I used 21 loops of Cotton King in 4 colors. It is single layer single unit twill. In the middle of braiding, I had about a-week off and restarted, which resulted in unequal pattern length. But it is OK. It is a hat and nobody will notice that, I hope. A hat on sale has become a special hat for me.
The famous braid belt with beads is on view at The Gallery of Horyuji Treasures in Tokyo. I wish I could go and see it. This braid belt is put on a cover of “日本の美術1 No. 308 組紐(くみひも)(Japanese Art No. 308 Kumihimo)". The cover is a close up of the belt and we can clearly see the glass beads. According to the book, the braid is a single-unit braiding of 2-strand threads of red, purple, vermilion, white, yellow, dark blue, blue and green. One of the 2 strands is S-twist and the other is Z-twist, which makes braiding extremely complicated. The title of the braid on the data base of Tokyo National Museum is “the remains of a belt with beads of pearl and crystal”. It is said to be made at the same period as those in the Shosoin Treasure Warehouse, but those in the Shosoin have no beads. This belt of Horyuji must have been worn by a high ranking noble person. The belt originally belonged to Horyuji Temple, but was donated, together with other treasures, to the royal family early in the Meiji Era when anti-Buddhism movement was at its peak. The temple had no financial power at that time to keep all the treasures and did not want the treasures to be scattered and lost. The donated treasures are today stored and exhibited at the Gallary of Horyuji Treasures of Tokyo National Museum in Ueno. For Horyuji Temple, it must have been an extremely difficult decision to make to donate the treasures which they had kept so long (1200 years!). However, now looking back, it seems to be a good decision. Thanks to Tokyo National Museum, we can now see the ancient braids. The Bansuishoku, which I talked about before, also belongs to Tokyo National Museum and was exhibited some years ago. At Horyuji temple, they give biannual exhibitions, but I have never seen braids or textiles there. Is it because dyed and woven works are difficult to handle?
I made a bag with a piece of torn-yarn woven fabric and Hakataori material. For the handles, I stitched single unit braiding kumihimo down to Hakataori material. I needed 60cm long handles, so I prepared 95cm threads.
I started the first braid from one end. It is so long that after each time I braid, I had to step forward to tighten the braided part leaving kute on the stands. It is quite an exercise. The second handle, I started from the middle. This way, I can tighten firmly holding kute all the time. The braided part looks nice and regular. The only problem is when you finish the half, you turn around the braid and attach kute. You have to look carefully at the threads and attach kute in right order. Luckily this time I only have 15 kute, and I could manage. The first half end looks like a V letter, and when I turned around the braid, it is naturally in a reversed V letter shape. That means now I have to braid from right to left whereas I braided from left to right in the first half. In fact it took me a while to realize this. My conclusion is, “You should braid a long braid from the middle”. By starting in the middle, you do not need to leave the kute and can braid fast and comfortably. Comfortably worked braids have regular stiches and each pattern has almost same length. When your braid look nice, you feel happy and you work even faster. Both the torn-yarn woven fabric and the Hakataobi material are grave mauve color. But with the braids, the bag became lively. It is going to be my favorite bag.
Today I am going to show you how to solo-braid Tollemache 8 which I learned at a workshop in Igaueno in October with Kute. I have already shown the braid in this blog in November last year together with other braids. I thought I could make more patterns using this technique. The original Tollemache way is for two persons, one holding 3 loops and the other 5 loops. The 3 loops form the border and the 5 loops form Koraigumi or Shigeuchi, repeating In and open (C) and In and closed (D). First please see the video showing how to braid alone. Below is the way I record the movements. I II L R L R 1 C 2 D 3 C 4 C 5 XX The initial color arrangement for the top blue braid with purple borders is as follow: ●●● 〇〇〇 〇〇 I braided shigeuchi with 5 loops first. It is the third from the top in the above photo. To the left part of the braid, I added borders and got the dark grey and vermillion braid above. I got the wine red and grey braid below by adding borders to the right part. ●●● ●●● 〇〇 ●●● 〇●● ●〇 Borders give different impressions to shigeuchi. The initial color arrangements for the 5th and the 6th are as follows: ●●● 〇◎● ●● ●●● 〇〇◎● ●●● The sixth braid has 7 loops for the shigeuchi part. The seventh is shigeuchi only which I braided with leftover threads. For the abbreviations C, D, please refer to "Kuteuchi Basic 4 Movements" .
The December workshop of the Kumihimo Society was Andean hand braiding. It is a unique braiding. We use nothing else but our hands. As is shown in the photo, you hold 4 groups of 4 threads each with the thumb and the index finger and leave the threads hanging down loose. As I always braid with tightened threads, it is not easy for me to handle the loose threads. Before I realize it, I often found myself holding 5 threads instead of 4 in a group. The instructor, Ms. Aoyagi, learned this technique in Peru, I heard. I really admire her. Not only had she learned such a unique technique, but also she communicates the technique to us clearly with drawings and sighs. I managed to braid it long enough to make a bracelet. It is satisfying to make progress in something which I could not do before. Though I can somehow braid now, I really do not understand why each movement makes this pattern. I need to try more patterns to understand the mechanism.
I reviewed the Loop Braiding textbook by Joy Boutrup at home taking my time. During the lesson, I was distracted by other people’s braiding and felt pressed wanting to try more new braids. I could not concentrate on my braiding. Among some 15 braids in the textbook, braids for a solo braider are the 4th from the top, Barley corn, the 6th and the 7th which are made by crosswise exchange, and the 8th that is Chevron broad and Chevron round. Others are for duet braiders. I braided the others as well alone using Kute. The bottom braid, Chevron, is Sasanamigumi which I braided a lot when I made Bansuishoku. I did not know it can be done with fingers as well. Chevron round is interesting. After exchanging the loops on both little fingers, you exchange loops on index fingers as well. Then the braid becomes tubular. That technique was new to me. With this technique we can also make a tubular Karakumi. I must try it! The 4th from the bottom is also tubular. After braiding flat, you exchange loops on little fingers as well as loops on index fingers. However, with index fingers exchange, you need a trick, rather two tricks to be exact. This technique can be very useful in similar situations. Joy-sensei’s textbook goes on. But I need a break now.
夕方には市内にある組紐工房を見学させて頂きました。ちょうど、来年のオリンピックの表彰式で着物姿のアシスタントの女性が身につける帯締めを作っておられました。工場では、機械がたくさんのボビンを操って長い紐を組んでいるのを見学しました。 忍者と組紐の街伊賀上野で、世界の組紐仲間と5日間を過ごせたことは、とても楽しい経験でした。会議の準備と実行にご尽力くださった多田牧子先生や多くの皆様方に心より感謝いたします。 I attend the 4th International Braiding Conference held in Igaueno Japan. Some 180 people gathered from 14 countries to learn about various braids. I participated in Susan Foulkes’s narrow belt waving class and Joy Boutrup’s loop braiding class, for 2 days each. We learned a lot and braided a lot. I concentrated on braiding and weaving so much that I was exhausted at the end of a day. This heddle Susan used in the class is a genius. There are long slits and small round holes alternately. Besides there are 9 medium long slits among them which hold pattern threads (pink ones in the photo). It is easy to pick up pattern threads with this heddle. During the workshop I sneaked out of the class and visited other classes, which was a fun. There were Takadai, Marudai, ply-split, card weaving, etc. All these were fascinating. During the period, the World Kumihimo and Fiber Arts Exhibition was held at Sukodo, an old school for young samurais. The building was lit in the evening with paper lanterns placed in the corridors giving an attractive atmosphere for Kumihimo to be exhibited. I exhibited 3 types of quadruple square braids kept in Chusonji temple, Saidaiji temple and Tomobuchi Shrine. All are braided with Hamanaka’s Applico (cotton yarn for knitting). I spend most of the April days working on these braids to submit them by the deadline of April 30th. In the late afternoon, we were invited to visit 2 Kumihimo studios. At one of them, they were braiding specially ordered Kumihimo for young lady assistants in Kimono who attend the awarding ceremonies of Olympic games next year! At the factory, we watched machines manipulate a number of bobbins to make a long braid. I am very happy that I could spend wonderful 5 days in Igaueno, the city of Ninja and Kumihimo. I thank from the bottom of my heart Makiko Tada sensei and others who worked hard to organize this occasion.